Alternative to plaster wall finishing

The clean, white, boxy rooms of modern architecture are all very crisp and neat but the reality for the occupants can be that they make for clinical, boring and echoic spaces without much sense of warmth and homeliness. All too often money is spent on plastering which is then covered up. Think long and hard before plastering a kitchen wall before cupboards and splashbacks make that work redundant.

Similarly, there is no need to cover up plasterwork with a fitted bookshelf or cupboards especially double sided ones serving a room on the other side. Hey, you might not even build a wall here let alone plaster both sides, just leave a large opening.

The Original Twist integrated concrete beam system can make a beautifully lit ceiling with wooden beams and boards …. but what about the walls? You might be wondering how to finish the stack of Durisol blocks you built with. The usual plastering solution needs a certain amount of organisation; the first fix plumbing and wiring has to be done and then the plasterer booked for some slot later. From start to finish it could be at least a couple of weeks before the plaster has dried and been painted. Even then there are many things a plain plastered wall does not deliver, so let’s have a look at the Original Twist concept wall and see what extra benefits can be achieved. Here are some ideas incorporated into one picture – it doesn’t have to be this busy.
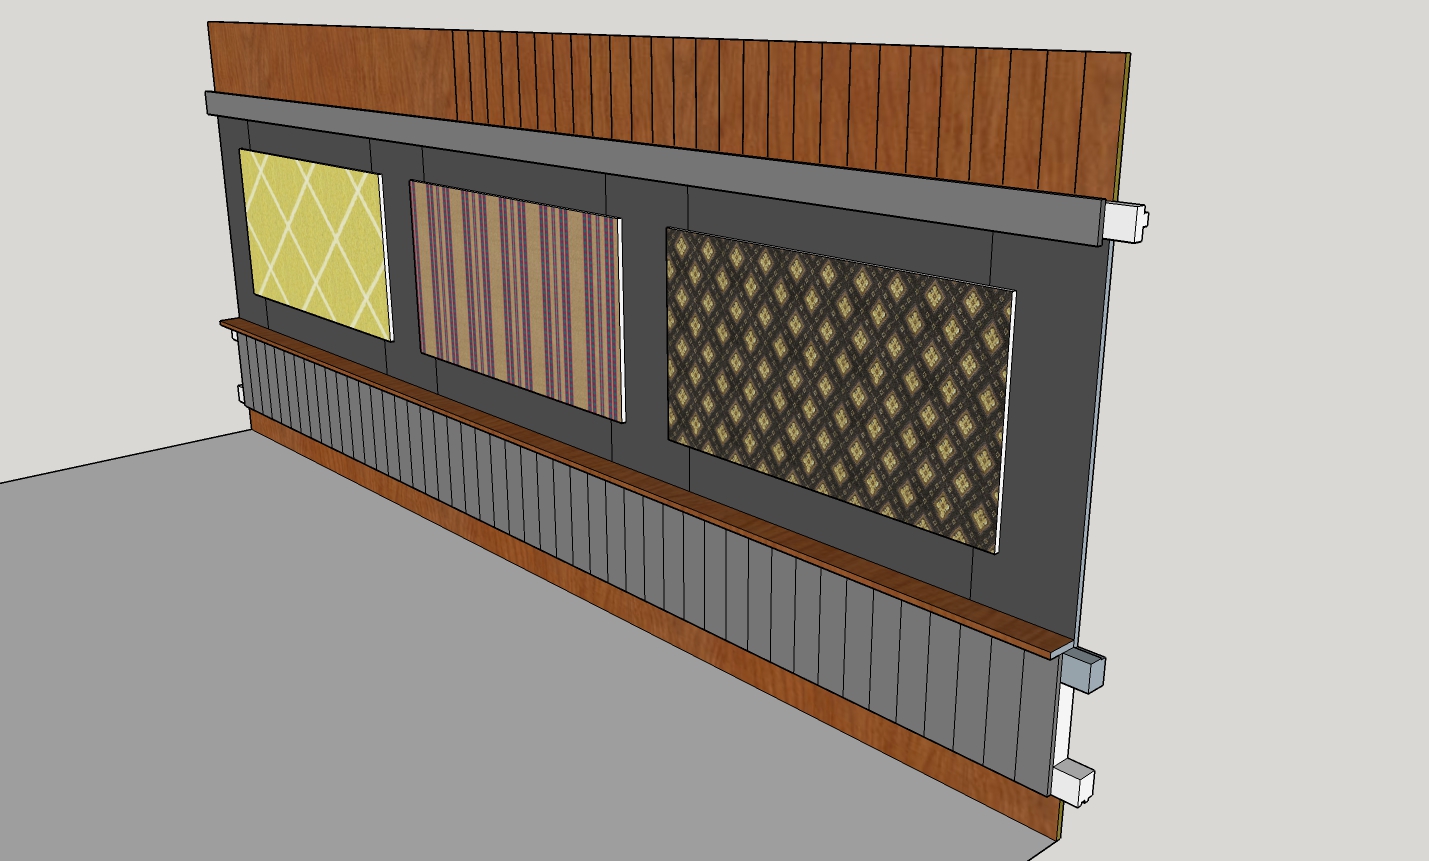
This or plaster?

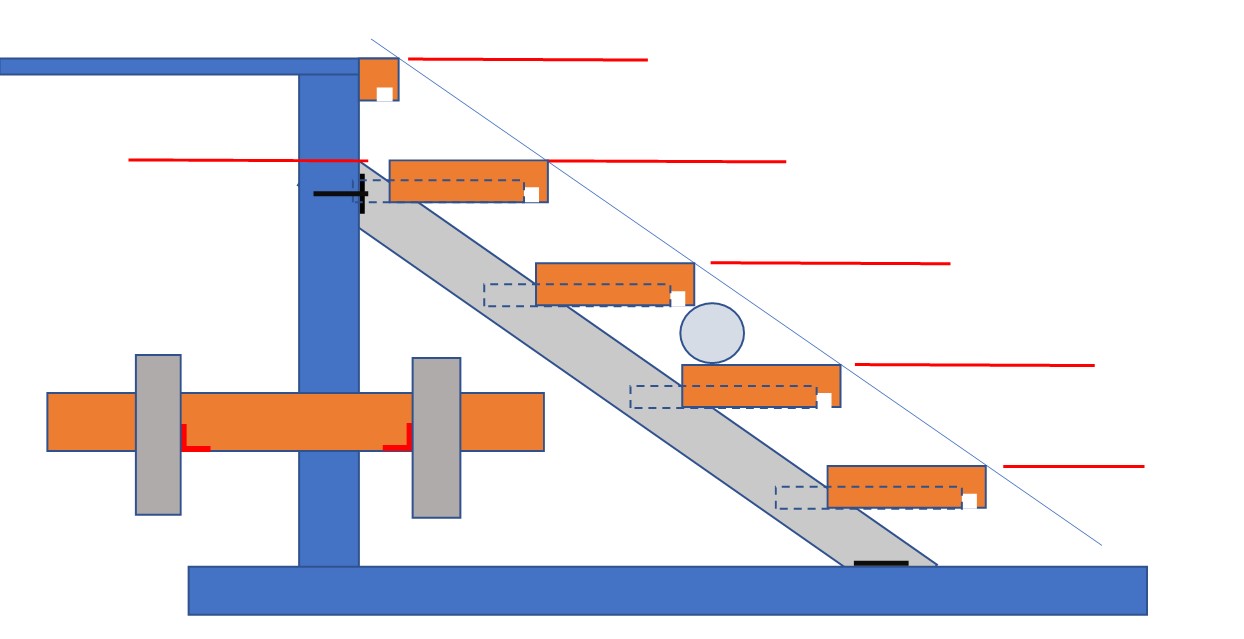
Basically there are three or four transverse wooden beams fixed to the wall and then panels fit somewhat loosely and quickly onto them. Extra insulation can be particularly easily added at this stage.

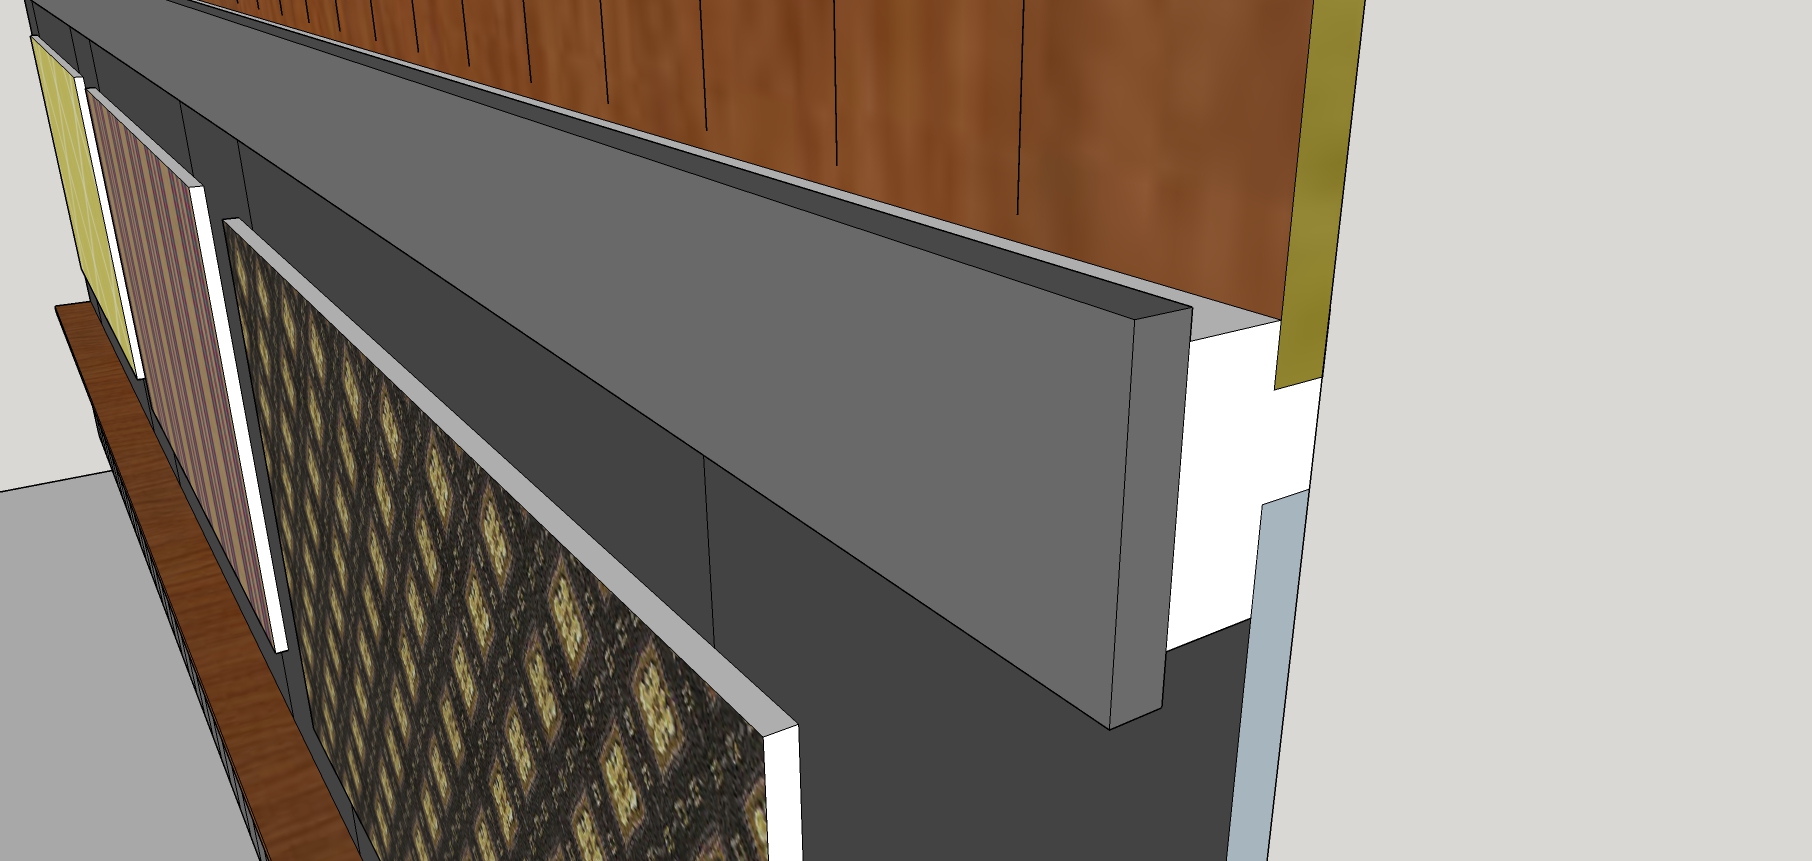
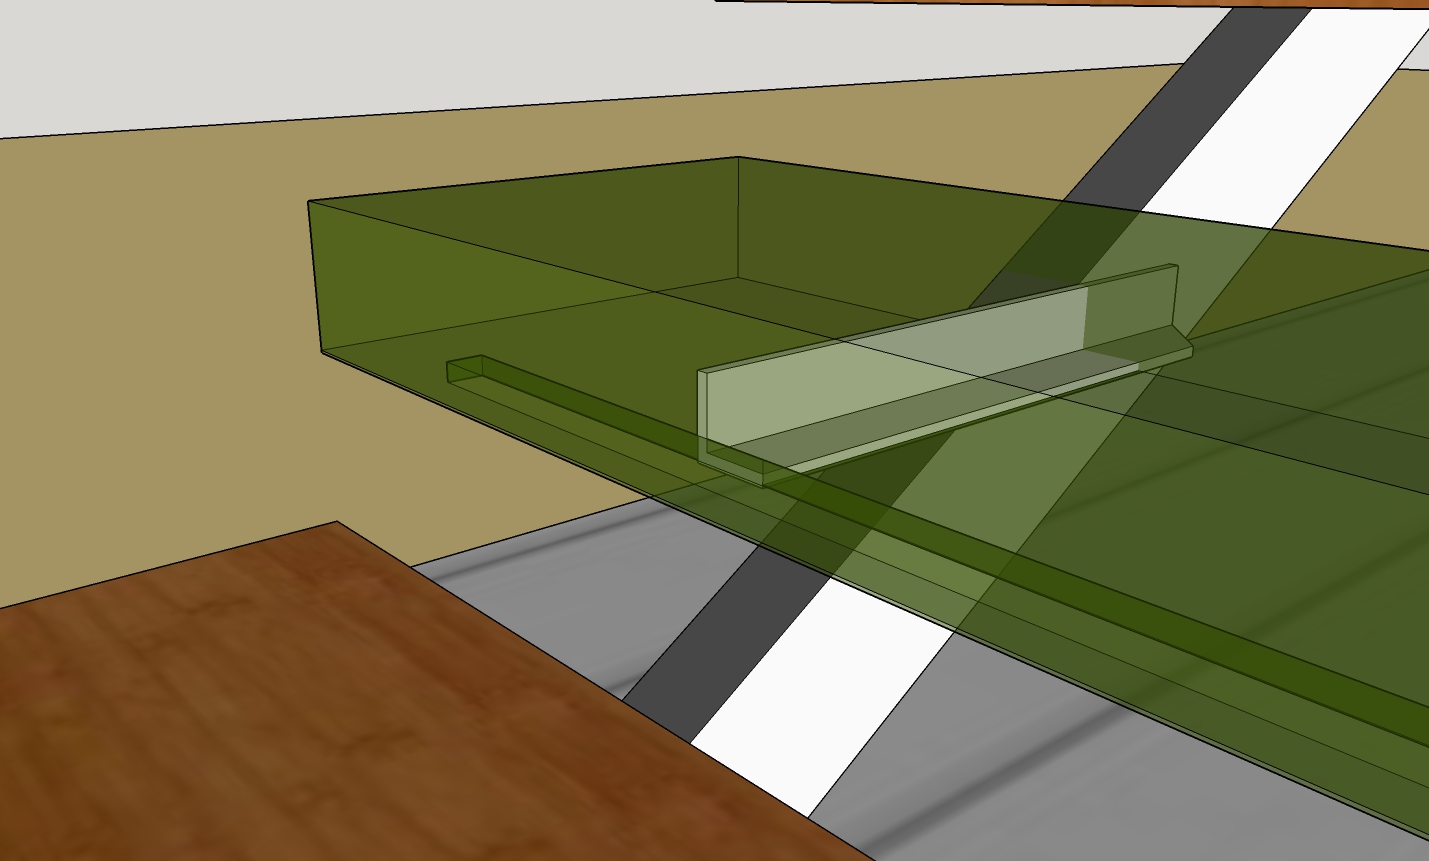
The top beam section

This top beam has a rebate sawn at the back to allow the top panel to be held in place then dab bonded to the wall or a top batten. Pictured is a strip of plywood with vertical marks scratched to resemble boards; quick and inexpensive. Strip LEDs are then laid on top of and under the beam and hidden behind the pelmet board – an inverted strip of skirting board would be good for this. Note how lovely the panels will look when the lights go on.

The next beam down has a similar rebate and here the larger panels are pushed up first to hook under the top beam before dropping into place on the beam below. Our top picture shows an example of black ash faced panels with OSB panels fitted on top. The latter can be covered in anything from wallpaper to fabrics and give unlimited scope for decoration; they could even match a TV screen. If engineered floor boards are being used for this section remember that many of them come in 1.2m lengths so designing for that might save a bit of time and not leave any waste.

The lowest section takes on a colonial look with tongue and groove boards under a shelf. The point of this is that wires and pipes can be hidden as can tubes for integrated dust extraction. Fan coil units for heating and air-conditioning can be fitted into this space with the inlet and outlet vents facing down and hidden. If possible the height of this section should be like kitchen cupboards so that doors and hinges can be incorporated and some mini cupboards too. The underside of the lowest beam has a routed slot for another LED strip light which will highlight the lower panel which acts like a deep skirting board.

So there we have it; loads of character, good sound absorption, sensational lighting, lots of utility and all quite easily done by any DIYer.

Internal walls in blockwork can be visually tied in by using the same beams but leaving the blockwork as the finish. Blocks can be painted in different shades before they are laid to make an interesting textured look. Any other wall incorporating a fireplace can be made in exposed brickwork to give a structural element with exposed brickwork on the reverse side. By the time all the remaining areas are covered by glass doors and a bit of wood panelling there may be very little plastering to be done at all.

Like what you’ve read? Find more essential reading on my e-book

‘Dream House – Down To The Details’ 101 things you should have thought of.      here:-

https://originaltwist.com/2017/02/16/1370/

Heating for your eco-house

For another example of sensible thinking, this time on heating systems, have a look here.

You really should get this right and there are many wrong turns where multiple energy sources are integrated.

More on this topic in LIST OF POSTS


Modern floating staircase

DIY floating stairs

How hard would it be to make a modern staircase to embellish your new build house? Not too hard is the answer, as long as you design it to be DIYable from the outset.

This modern staircase is based on two 100×50 HRS hollow steel box beams with chunky wooden treads supported on 40x40x6 bright mild steel angle iron support bars welded onto the beams. If you are handy with a router and a welder (MIG is easy) then the construction should be quite straightforward.

The angle iron bars are completely hidden inside the treads which appear to float without any means of support. Double click the image for a closer look.

The slot shown under the front of each tread is for LED strip lights which can be bought in aluminium channels with diffuser covers. Leave a little space around and under them for cooling and rout out a channel under the angle iron for the wires. You also need a hole through the angle iron and the box section for the wires to pass into the box section, preferably with a rubber grommet. All the wires go down to the bottom step which will house the control elements for making the lights do all the tricks you can imagine. The stairs lit with any colour you chose will be absolutely stunning.

A bought in staircase like this would cost at least £5,000 – £10,000 so you can afford to sub out some of the work to make it easier and buy any tools you need. The routing work is very repetitious and it would be worth getting a local CNC router on the case; there is only about an hour of machining time and accuracy will be perfect. Get the angle iron brackets cut to length too. There will be many chamfered holes to make so I’d say a pillar drill will be essential.

The Design

stairs geometry

Tradition has it that a comfort stair is 7” x 11” for rise and going. Rounding up slightly that’s 180 x 280mm. B.S. regulations give ranges for rise of150 -220mm and 220-300mm for going G. The ratio of rise to going gives an important angle which here would be around 33 degrees and must not exceed 42 degrees. You’ll need this angle to saw off the ends of the beams.

The distance H between your two floor levels will set the rise. Find which whole number divides into H to give a rise R near to 180mm or what you prefer. That whole number is one more than the number of treads but note that the bottom tread might be a platform like the one on the sketch above.

Tread thickness T.  B.S. regs state that a 100mm ball must not pass between stairs or guards so if we say that the open gap between the treads will be 98mm then T = R – 98 or more.

The Going overlap. B.S. regs state that the overlap on open stairs must exceed 16mm but too much spoils the design, as you will see when you draw yours. So tread width W = G + 20 will do for a start.

So the treads will be something like 300 x 80 in section. As for length just bear in mind that stairs over a metre wide must have hand rails on both sides. I think 85cm looks about right.

Length of box beams L. To make life easy you could set the top of the box beam level with the top of the top tread, so; The base of our triangle is (no of treads -1) x G / R and then just use Pythagoras to get the longest length of box…. or, frankly, just draw it and see what you get. The drawing will reveal what angle to cut on the ends of the box beams too.

Make a note of all your numbers then make a drawing of the side elevation to scale. Sketchup is perfect for this and is free and easy to use. Note the intersection of the top of the angle iron, the beam and the back of the tread. N.B. Sketchup can repeat copies easily so draw and colour just one tread then copy it upwards by the rise and then across by multiples of the going.

Safe assembly with no cock ups.

After drawing the beams etc, cut the angles on the beam ends and with the beams lying on a flat surface weld on a few cross stabilisers to secure the shape; they must remain dead parallel. The beams have cross plates welded across the ends but bolt these on to the wall/floor first then weld on the beams assembly in situ. So far no risk. Now take a fully assembled tread unit and fit the only tricky tread, the top one. Make sure that is going to work with the top floor level then clamp and tack it on. All the rest are easy and risk free. Start from the top to prevent weld spatter from spoiling lower treads and grind off the stabilisers as you go. Don’t do the final welds until you are sure it is all perfect. N.B. it’s the tread positions that matter; any minor inaccuracies on the angle iron supports are hidden anyway.

If you make these stairs I’d be very glad to hear about it and to put  your photo with this article.

Like what you’ve read? Find more essential reading on my e-book

‘Dream House – Down To The Details’ 101 things you should have thought of.      here:-

Heating for your eco-house

For another example of out of the box thinking, this time on heating systems, have a look here.

You really should get the heating right and there are many wrong turns where multiple energy sources are integrated. More on this topic in LIST OF POSTS

Integrated Concrete Beam System

Integrated Concrete Beams

Building with Durisol, Quadlock or any other ICF blocks? Here’s the easy way to do a poured concrete floor.

Concrete first floors are good; low noise transmission, high thermal mass and suitable for under-floor heating. The trouble is the shuttering required is elaborate and expensive both in materials and time and once the floor is poured there is usually more work involved in boarding, plastering and painting. Concrete block and beam systems look easier but you do need to be very organised and get delivery of exactly the right beams and after paying for heavy lifting gear they won’t look like a cheap fix. Again there will be final finishing to do. Plastering and painting ceilings – no thanks.

The Original Twist Integrated Concrete Beam system is so suitable for the self builder that it is hard to consider anything else. It couldn’t be simpler. You make up some hollow beams out of easily sourced planks, put them up in a row, fill the gaps with wooden floorboards and pour. That’s it.

Concrete floor system

Step 1/.

Make up the wooden beams as shown in this cross section. The blue and yellow bits are your choice of regular timber from your local supplier.  The slots sawn out of the yellow sections are for wiring channels and it makes sense to insert the wires while the beam is being assembled. The threaded studding stops the beam spreading when the concrete pours in and is part of the construction with the outside acorn nuts making a decorative feature. Use a spindle moulder or router to round off the edges and then apply your choice of finish after distressing with chain, hammer, belt sander etc. You will see that the yellow sections stick up by the thickness of your floor planks and make a perfectly curved transition between the concrete floor and the integral ‘I’ beams. The rebar at the bottom of the ‘I’ section needs to be held in position prior to the pour and this can be done easily and cheaply with pairs of cup hooks screwed into the bottom plank. Use cable ties across each pair to hold the rebars in. Finally, paint the inside of the beam to isolate it from the wet concrete. The beams are then ready to be placed in position, typically on a one metre pitch (Durisol blocks are half a metre wide) and each propped with one or two Acrow props. If you are using ICFs like Durisol for your walls you should cut out large slots on the inside face to take the beam ends. You might want to pour the walls up to the level of the beam bases now.

Step 2/.

The floor planks can be cut and finished at ground level before fitting between adjacent beams. Now is the time to fit any pockets for spot lamps and take the wiring back towards the slots pre-cut in the main beams. The floor planks need to be strong enough to resist the weight of the concrete without sagging; they don’t need to be jointed together as a layer of building paper over the top will stop any leaks. Unlike concrete blocks they are light and easy to pass up to your helper.

Step 3/.

With steel mesh over the beams and planks the floor is ready to pour.  The outside of the Durisol blocks sets the top level of the floor so you don’t even need any shuttering. Once the pour is done and set, the walls and floor are all integrated with the homogeneous ‘I’ sections in the beams giving enormous strength and stiffness. The ‘I’ section parts of the floor could be up to 360mm deep which makes them into a row of significant beams in their own right. At this point the lower part of the house is waterproof which makes for a good working environment from which to finish off the rest.

Step 4/.

Nothing much to do now. Just take down the props then go down to the pub to celebrate all the money and time you’ve saved. There is no ceiling finishing to do, no shuttering to take down, even the lights are fitted and wired. And all this was done with simple hand tools and without waiting for special parts to be delivered. And just look; lovely lovely beams adding character and value to your home.

Notes:

A small spacer between the top of the beam and the floor joists will create a gap to house some LED strip lights. As you have a lovely wooden ceiling you might as well show it off.

N.B. Wood shrinks. A tiny air gap could eventually appear between the concrete floor and the wood floor. A very thin rubber membrane between the floors (instead of the building paper) will prevent any ‘thwack’ as the upper floor is walked on.

Ground floor block and beam – alternative system

Block and beam systems are commonly used for ground floor construction but again they can’t compete with our integrated beam system. Block and beam materials all have to brought to site and then assembled – lots of work there. All those blocks are more gap fillers than strength givers and they are followed by a poured screed anyway. With the integrated beam system you just string out the wooden beams, fill the gaps with plywood and then pour – not only much quicker but stronger too. Use adjustable legs from kitchen units as props, to prevent sagging, and leave them there forever.

With both floors quickly and cheaply constructed and the walls easily made with ICFs it is easy to see that a fully waterproof house up to the first floor could be made in a matter of just a few days. That saves time and money and less exposure to problems with bad weather.

structural fireplace and stove.

While the rest goes up the internal finishing can start on the first level. Some comments on this here…. and an internal wall cum fireplace design here. … and a floating staircase here.

While this system is great for under floor heating, I’m really not in favour of it for bedrooms as it is a big waste of money for an unwanted result. More on that in the eco-heating link below.

N.B. As usual do your own evaluation for suitability.

Heating for your eco-house      For essential reading on heating systems, have a look here:

You really should get this right and there are many wrong turns where multiple energy sources are integrated.

More house building topics in LIST OF POSTS