DIY floating stairs
How hard would it be to make a modern staircase to embellish your new build house? Not too hard is the answer, as long as you design it to be DIYable from the outset.

This modern staircase is based on two 100×50 HRS hollow steel box beams with chunky wooden treads supported on 40x40x6 bright mild steel angle iron support bars welded onto the beams. If you are handy with a router and a welder (MIG is easy) then the construction should be quite straightforward.
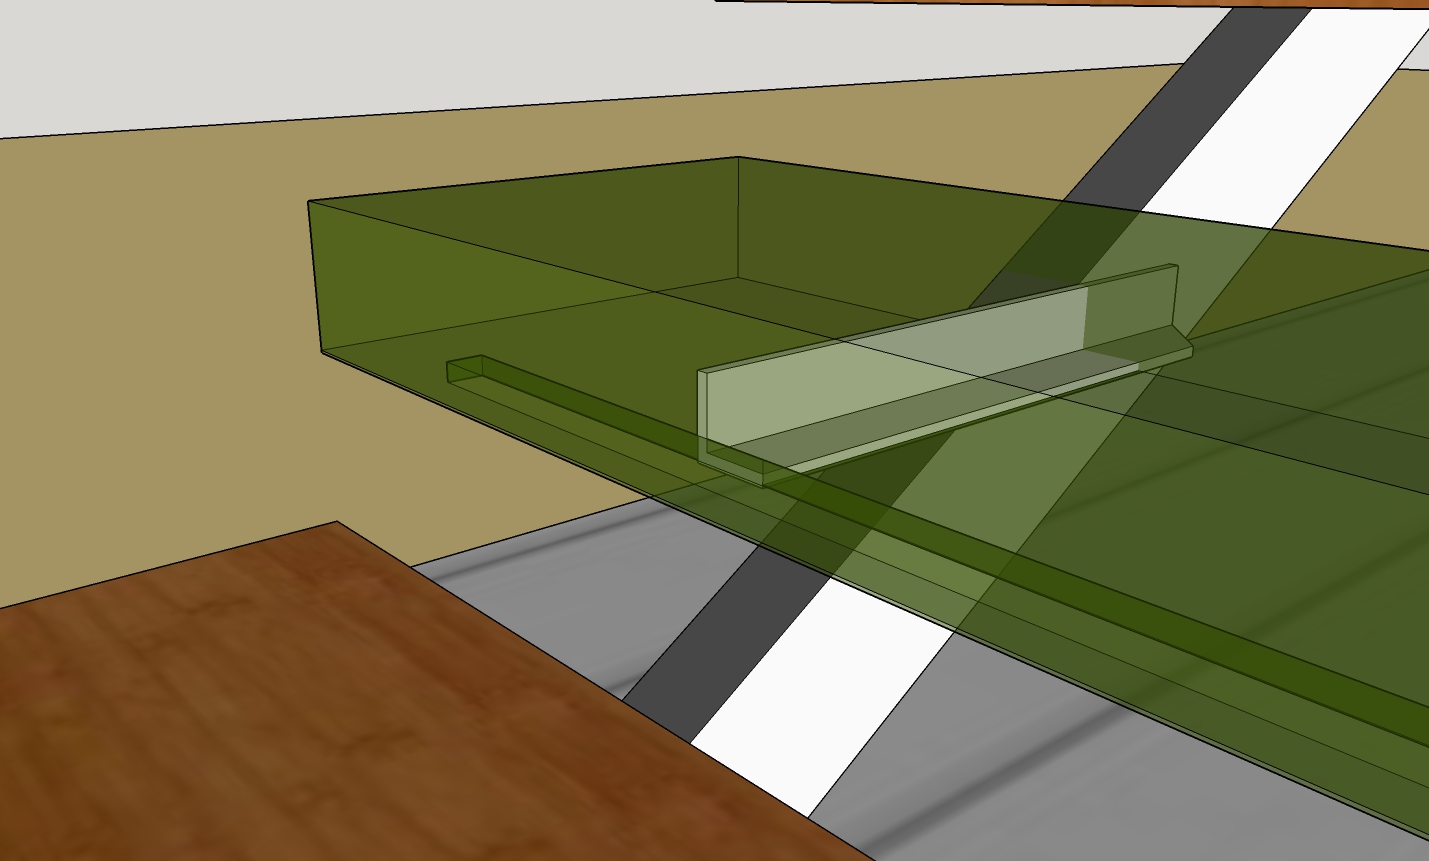 The angle iron bars are completely hidden inside the treads which appear to float without any means of support. Double click the image for a closer look.
The slot shown under the front of each tread is for LED strip lights which can be bought in aluminium channels with diffuser covers. Leave a little space around and under them for cooling and rout out a channel under the angle iron for the wires. You also need a hole through the angle iron and the box section for the wires to pass into the box section, preferably with a rubber grommet. All the wires go down to the bottom step which will house the control elements for making the lights do all the tricks you can imagine. The stairs lit with any colour you chose will be absolutely stunning.
A bought in staircase like this would cost at least £5,000 – £10,000 so you can afford to sub out some of the work to make it easier and buy any tools you need. The routing work is very repetitious and it would be worth getting a local CNC router on the case; there is only about an hour of machining time and accuracy will be perfect. Get the angle iron brackets cut to length too. There will be many chamfered holes to make so I’d say a pillar drill will be essential.
The Design
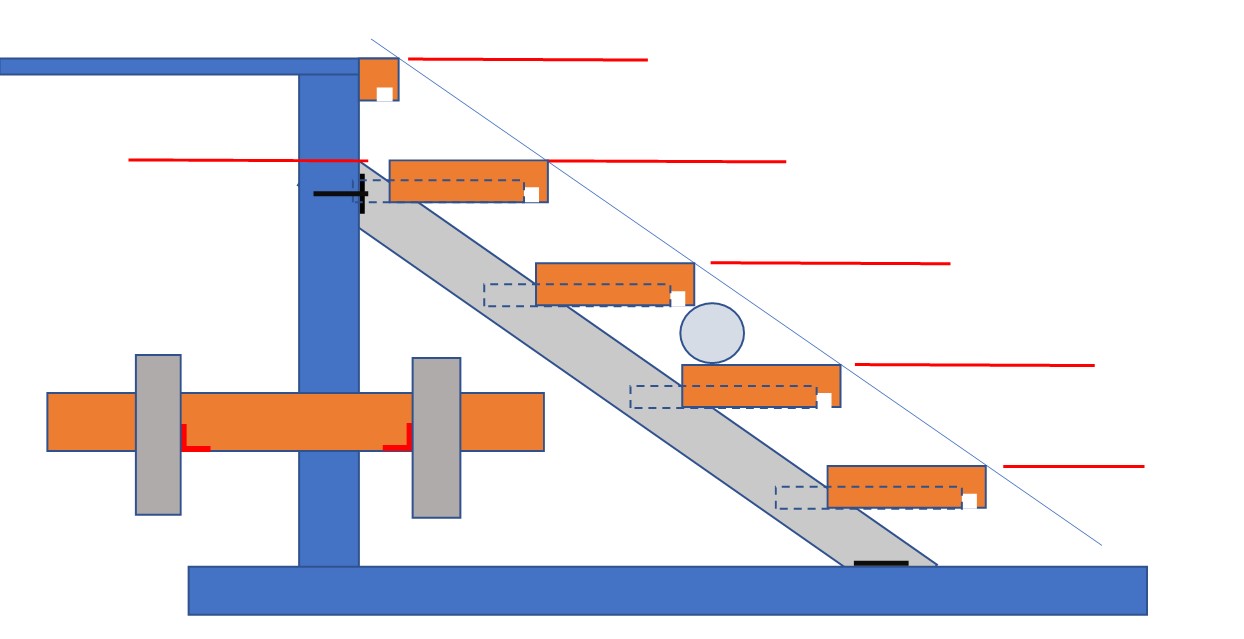
stairs geometry
Tradition has it that a comfort stair is 7” x 11” for rise and going. Rounding up slightly that’s 180 x 280mm. B.S. regulations give ranges for rise of150 -220mm and 220-300mm for going G. The ratio of rise to going gives an important angle which here would be around 33 degrees and must not exceed 42 degrees. You’ll need this angle to saw off the ends of the beams.
The distance H between your two floor levels will set the rise. Find which whole number divides into H to give a rise R near to 180mm or what you prefer. That whole number is one more than the number of treads but note that the bottom tread might be a platform like the one on the sketch above.
Tread thickness T. B.S. regs state that a 100mm ball must not pass between stairs or guards so if we say that the open gap between the treads will be 98mm then T = R – 98 or more.
The Going overlap. B.S. regs state that the overlap on open stairs must exceed 16mm but too much spoils the design, as you will see when you draw yours. So tread width W = G + 20 will do for a start.
So the treads will be something like 300 x 80 in section. As for length just bear in mind that stairs over a metre wide must have hand rails on both sides. I think 85cm looks about right.
Length of box beams L. To make life easy you could set the top of the box beam level with the top of the top tread, so; The base of our triangle is (no of treads -1) x G / R and then just use Pythagoras to get the longest length of box…. or, frankly, just draw it and see what you get. The drawing will reveal what angle to cut on the ends of the box beams too.
Make a note of all your numbers then make a drawing of the side elevation to scale. Sketchup is perfect for this and is free and easy to use. Note the intersection of the top of the angle iron, the beam and the back of the tread. N.B. Sketchup can repeat copies easily so draw and colour just one tread then copy it upwards by the rise and then across by multiples of the going.
Safe assembly with no cock ups.
After drawing the beams etc, cut the angles on the beam ends and with the beams lying on a flat surface weld on a few cross stabilisers to secure the shape; they must remain dead parallel. The beams have cross plates welded across the ends but bolt these on to the wall/floor first then weld on the beams assembly in situ. So far no risk. Now take a fully assembled tread unit and fit the only tricky tread, the top one. Make sure that is going to work with the top floor level then clamp and tack it on. All the rest are easy and risk free. Start from the top to prevent weld spatter from spoiling lower treads and grind off the stabilisers as you go. Don’t do the final welds until you are sure it is all perfect. N.B. it’s the tread positions that matter; any minor inaccuracies on the angle iron supports are hidden anyway.
If you make these stairs I’d be very glad to hear about it and to put your photo with this article.
Like what you’ve read? Find more essential reading on my e-book
‘Dream House – Down To The Details’ 101 things you should have thought of. here:-
Heating for your eco-house
For another example of out of the box thinking, this time on heating systems, have a look here.
You really should get the heating right and there are many wrong turns where multiple energy sources are integrated. More on this topic in LIST OF POSTS


