Integrated Concrete Beams
Building with Durisol, Quadlock or any other ICF blocks? Here’s the easy way to do a poured concrete floor.
Concrete first floors are good; low noise transmission, high thermal mass and suitable for under-floor heating. The trouble is the shuttering required is elaborate and expensive both in materials and time and once the floor is poured there is usually more work involved in boarding, plastering and painting. Concrete block and beam systems look easier but you do need to be very organised and get delivery of exactly the right beams and after paying for heavy lifting gear they won’t look like a cheap fix. Again there will be final finishing to do. Plastering and painting ceilings – no thanks.
The Original Twist Integrated Concrete Beam system is so suitable for the self builder that it is hard to consider anything else. It couldn’t be simpler. You make up some hollow beams out of easily sourced planks, put them up in a row, fill the gaps with wooden floorboards and pour. That’s it.
Concrete floor system
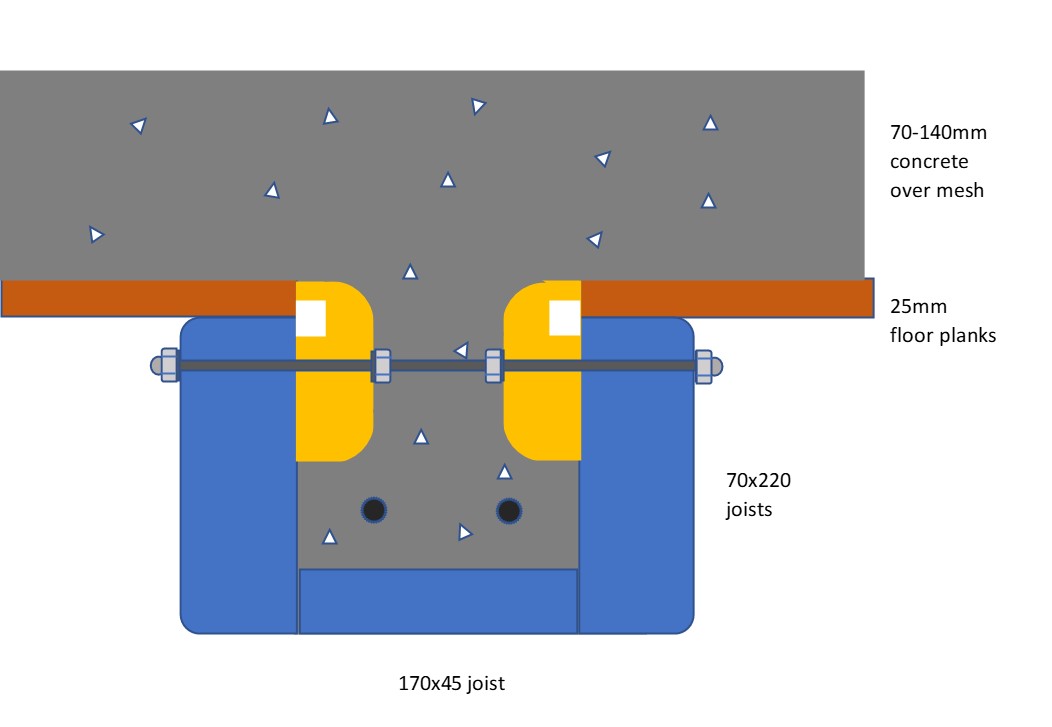
Step 1/.
Make up the wooden beams as shown in this cross section. The blue and yellow bits are your choice of regular timber from your local supplier. The slots sawn out of the yellow sections are for wiring channels and it makes sense to insert the wires while the beam is being assembled. The threaded studding stops the beam spreading when the concrete pours in and is part of the construction with the outside acorn nuts making a decorative feature. Use a spindle moulder or router to round off the edges and then apply your choice of finish after distressing with chain, hammer, belt sander etc. You will see that the yellow sections stick up by the thickness of your floor planks and make a perfectly curved transition between the concrete floor and the integral ‘I’ beams. The rebar at the bottom of the ‘I’ section needs to be held in position prior to the pour and this can be done easily and cheaply with pairs of cup hooks screwed into the bottom plank. Use cable ties across each pair to hold the rebars in. Finally, paint the inside of the beam to isolate it from the wet concrete. The beams are then ready to be placed in position, typically on a one metre pitch (Durisol blocks are half a metre wide) and each propped with one or two Acrow props. If you are using ICFs like Durisol for your walls you should cut out large slots on the inside face to take the beam ends. You might want to pour the walls up to the level of the beam bases now.
Step 2/.
The floor planks can be cut and finished at ground level before fitting between adjacent beams. Now is the time to fit any pockets for spot lamps and take the wiring back towards the slots pre-cut in the main beams. The floor planks need to be strong enough to resist the weight of the concrete without sagging; they don’t need to be jointed together as a layer of building paper over the top will stop any leaks. Unlike concrete blocks they are light and easy to pass up to your helper.
Step 3/.
With steel mesh over the beams and planks the floor is ready to pour. The outside of the Durisol blocks sets the top level of the floor so you don’t even need any shuttering. Once the pour is done and set, the walls and floor are all integrated with the homogeneous ‘I’ sections in the beams giving enormous strength and stiffness. The ‘I’ section parts of the floor could be up to 360mm deep which makes them into a row of significant beams in their own right. At this point the lower part of the house is waterproof which makes for a good working environment from which to finish off the rest.
Step 4/.
Nothing much to do now. Just take down the props then go down to the pub to celebrate all the money and time you’ve saved. There is no ceiling finishing to do, no shuttering to take down, even the lights are fitted and wired. And all this was done with simple hand tools and without waiting for special parts to be delivered. And just look; lovely lovely beams adding character and value to your home.
Notes:
A small spacer between the top of the beam and the floor joists will create a gap to house some LED strip lights. As you have a lovely wooden ceiling you might as well show it off.
N.B. Wood shrinks. A tiny air gap could eventually appear between the concrete floor and the wood floor. A very thin rubber membrane between the floors (instead of the building paper) will prevent any ‘thwack’ as the upper floor is walked on.
Ground floor block and beam – alternative system
Block and beam systems are commonly used for ground floor construction but again they can’t compete with our integrated beam system. Block and beam materials all have to brought to site and then assembled – lots of work there. All those blocks are more gap fillers than strength givers and they are followed by a poured screed anyway. With the integrated beam system you just string out the wooden beams, fill the gaps with plywood and then pour – not only much quicker but stronger too. Use adjustable legs from kitchen units as props, to prevent sagging, and leave them there forever.
With both floors quickly and cheaply constructed and the walls easily made with ICFs it is easy to see that a fully waterproof house up to the first floor could be made in a matter of just a few days. That saves time and money and less exposure to problems with bad weather.

structural fireplace and stove.
While the rest goes up the internal finishing can start on the first level. Some comments on this here…. and an internal wall cum fireplace design here. … and a floating staircase here.
While this system is great for under floor heating, I’m really not in favour of it for bedrooms as it is a big waste of money for an unwanted result. More on that in the eco-heating link below.
N.B. As usual do your own evaluation for suitability.
Heating for your eco-house For essential reading on heating systems, have a look here:
You really should get this right and there are many wrong turns where multiple energy sources are integrated.
More house building topics in LIST OF POSTS


