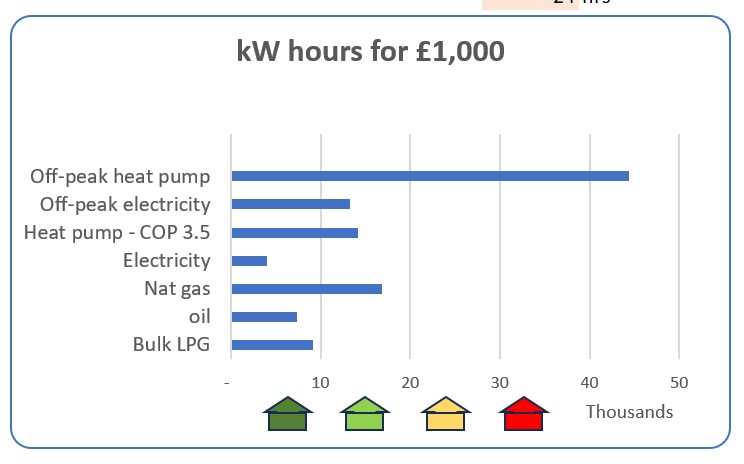
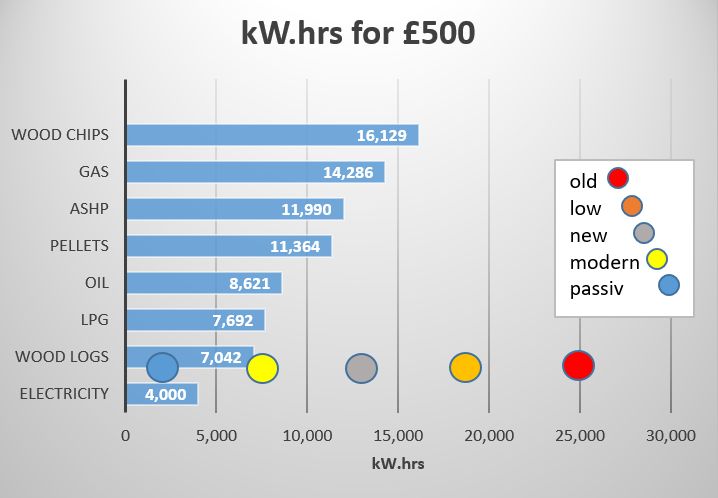
Plugging in the new April price caps and prevailing war driven spikes this is roughly how many kW hours £1,000 buys you. Gas and electricity will be fixed until July but oil and LPG will certainly remain volatile. Oil, for example, has shot up to £1.31 a litre (good chart on Boilerjuice) so if you are living in a big old leaky house, like the red one below, your heating bill will be over £4,000. Extrapolating from the bar of your particular fuel will give a good bills prediction with the orange house giving targets for most people using around 25,000 kW hours a year. As usual, at the extremes, a direct electric resistance heater is the worst thing to turn on (even half as good as oil) while the best strategy is to harvest cheap rate energy with a heat pump and store it in a tank for later use. While that heat pump trumps everything it is notable that off-peak electricity is currently better than oil or LPG; maybe night storage heaters are due for a comeback.
Trying to find a filling station that had any diesel left at all was a bit of a wake-up call; an electric car, with attendant cheap night rates, could lower heating and fuel costs while giving some protection from energy crises. Bi-directional chargers? Still ‘on the way’ but could be just months now so choose your car with care.
If these prices persist into next winter the Government will no longer be able to support the price cap so expect some unpleasant changes.
If this sudden price shock is prompting you to take some action you might take a look at ‘Absolute ultimate heat pump system’ where there may be one or two useful ideas for your heating strategy.
Meanwhile, solar panel prices continue to fall and make even more sense. They pair especially well with a mini-split heat pump which is not only cheap to install (£2,000 ish) but gives a welcome addition of air conditioning during these hot summers.
Cheaper batteries are worth considering although payback times still look long. While export rates are falling the idea of giving access to your battery when the grid is stressed is looking tempting. Check out ‘Axle’ who will pay you £1 for every kW hour they take. For that money they can hammer your battery as much as they like. N.B. Check out their compatible inverter/chargers before you install your PV.
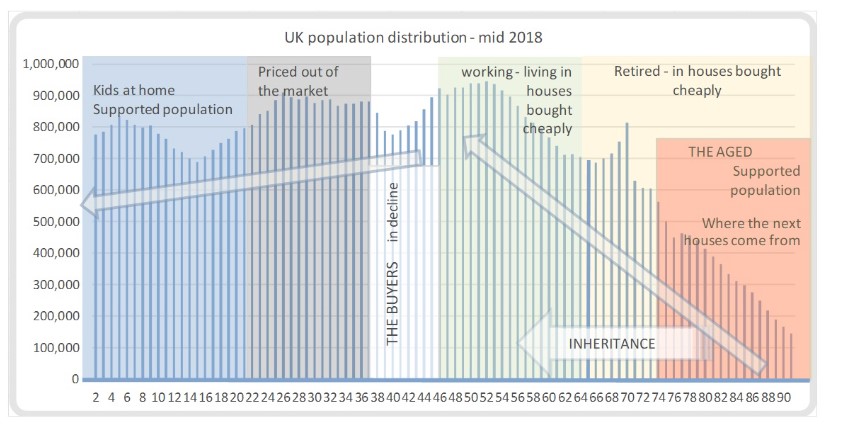
The shape of the UK population in 2018 told a familiar story. The large post-war “baby boomer” cohort — visible as a pronounced bulge in the age distribution — had dominated economic life for decades. This generation benefited from stable employment, affordable housing, rising property values, and strong economic growth. Many accumulated substantial housing equity and later inherited increasingly valuable family homes. Comfortable retirements, foreign holidays, and rising living standards were hallmarks of that era.
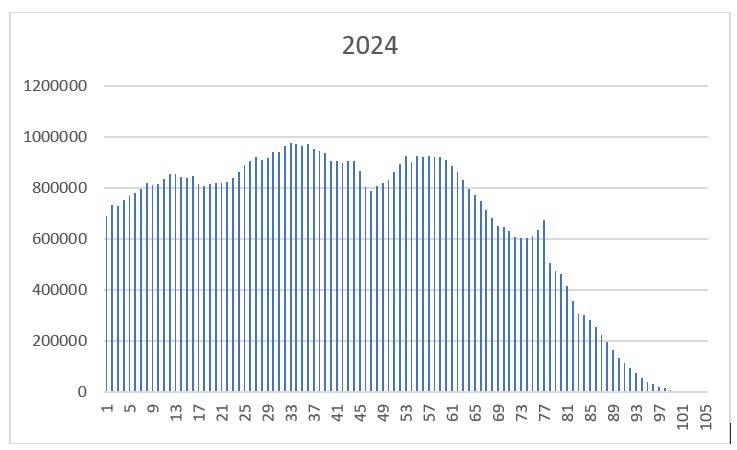
Six years later, the 2024 population profile reveals a different picture.
Chart 1: UK Population by Age, 2018
Caption: The 2018 age distribution shows the prominent post-war baby boomer bulge (right-hand side). At this point, much of this cohort was approaching retirement, holding substantial housing wealth and representing a dominant economic force.
In 2018, the boomer generation was still economically influential. Many remained in work, while others were entering retirement with significant accumulated assets. Their size amplified their impact on housing markets, healthcare demand, pensions, and consumer spending.
A Declining Birth Rate and an Ageing Nation
The most striking feature of the 2024 chart is the continued fall in birth rates — a trend extending back roughly 60 years. The supply of younger workers is no longer expanding fast enough to support a growing retired population. The UK appears to be shifting from demographic expansion to structural ageing.
Chart 2: UK Population by Age, 2024
Caption: By 2024, the baby boomer peak has begun to shrink due to natural attrition, while birth rates remain historically low. The reduction in births highlights a reduced inflow of future workers.
The reduction in the boomer peak reflects ageing and mortality, with the COVID-19 period likely contributing. Meanwhile, the lower birth rate narrows the base of the pyramid, reinforcing long-term workforce constraints.
The 65-year threshold illustrates that the flow into retirement will continue for at least another decade. A comparatively smaller working-age population must generate sufficient tax revenue to fund pensions and healthcare. For now, the boomer generation’s children remain numerous enough to shoulder much of that responsibility.
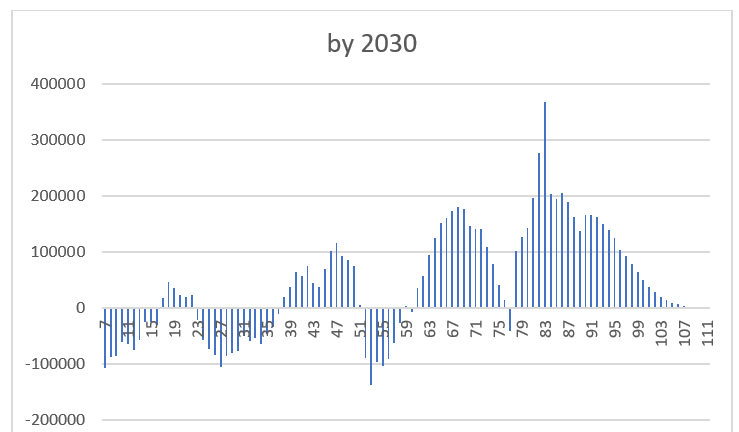
Projecting Forward: 2030
To understand what happens next, we can shift the 2024 age profile forward by six years.
Chart 3: Projected Change in Age Groups, 2024–2030
Caption: Difference chart showing the change in population numbers between 2024 and 2030 (assuming simple age progression). The largest increases occur in older age groups, intensifying pension and healthcare pressures.
Even without adjusting for mortality, the projected increase in older age groups is clear. Given average life expectancy of around 83 years, attrition will reduce the oldest segments, but not before a sustained period of elevated demand on healthcare and pension systems.
The following block represents the steady swell of retirees exiting the workforce.
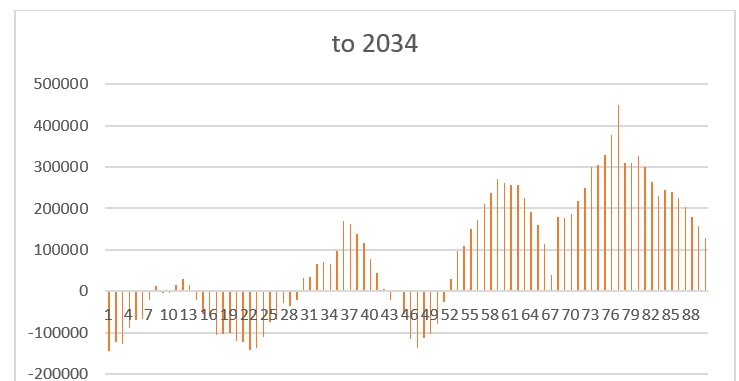
Extending the Projection: 2034
Looking ten years ahead from the 2024 baseline makes the ageing shift even more pronounced.
Chart 4: Projected Change in Age Groups, 2024–2034
Caption: Ten-year projection highlighting a substantial expansion in older age cohorts. Figures are measured in hundreds of thousands, underscoring the fiscal significance of demographic ageing.
The scale of the ageing population becomes economically material. Pension liabilities, healthcare costs, and age-related public spending will remain elevated throughout this period.
All pension liabilities are a form of debt – a promise to pay at a future date – and this chart only shows the changes coming. The main blocks from which these figures are derived are still present and significant and yet they do not count as a component of the national debt.
Wealth Transfer and the Housing Question
One frequently raised concern is whether a wave of property sales will destabilise housing markets as older homeowners pass away. This appears unlikely to produce a sudden glut. Much housing will transfer through inheritance rather than open-market sale. Properties are likely to cascade down the generational ladder.
Over the next decade or two, the UK may experience one of the largest intergenerational wealth transfers in its history. For the boomer generation’s children — currently in their prime working years — this could provide relative financial stability during demographic adjustment.
The Longer-Term Challenge
The deeper structural issue emerges further ahead.
When the boomer generation’s children retire — roughly 25 to 30 years from now — they will be followed by a significantly smaller cohort. If birth rates remain subdued, the tax base may struggle to sustain pensions, healthcare, and public services at current levels.
This challenge is not unique to the UK. Across Europe, demographic pressures are intensifying. Countries such as France face similar trajectories, while Germany and Italy confront even sharper ageing profiles.
A Generation That Shaped the Economy
The defining story is the rise and fall of the baby boomer bulge. At peak working age, it drove growth and prosperity. As it aged, economic momentum slowed, pension obligations expanded, and healthcare demands rose.
For the next decade, relative stability is plausible as wealth transfers offset some pressures. Beyond that horizon, demographic arithmetic becomes harder to ignore.
The UK’s long-term prosperity will depend on how effectively it responds — through productivity gains, workforce participation, immigration policy, technological innovation, and pension reform.
Demography is not destiny. But it sets powerful constraints — and the charts suggest the most significant adjustments are still to come.
In the UK you can drive a light quadricycle on a motorcycle licence. There’s not much to these vehicles so this begs the question – could you actually just make one? I’m thinking pretty much on the kitchen table and using just regular hand tools.
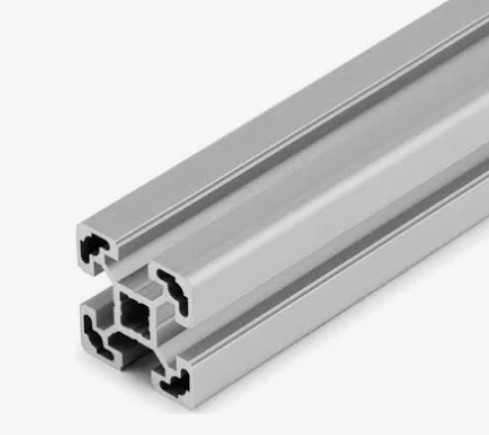
Here the body has a frame made with these aluminium extrusions.
The ‘T’ slots enable panels of polycarbonate and plywood to be easily bolted on or slotted in. With a side profile of 1.2m x 1.2m at this stage it is still easily lifted off the kitchen table and with a plastic chair inside you can already sit in it. What makes it go?
There are loads of ads for electric hub motors for scooters and a pair of these at the back would be perfect. Failing that, a pair of decapitated scooters bolted to the floor would provide power and batteries all in one go. Just make sure you don’t exceed 6kW if you want to keep to a simpler light quadricycle. At the front you could use go-kart parts to provide brakes and steering although the front wheels you chopped off your scooters might do. Even better might be a ready made cyclekart front axle – see link below.
Lights? Just bike stuff, even torches. Speedo? Phone. Wipers? Nah, just prop open the screen. Suspension? Possibly not needed at such low speeds but tennis balls make cheap springs. Luggage? Box at the back doubles as a seat.
So, lots of ideas that might provide inspiration for a fun project and ultimately make the school run interesting and economical.
You might find it hard to tear yourself away from the cyclekart web site. If you are inspired in this direction have a look at the OriginalTwist 3-wheeler here which might tie in nicely. A cyclekart Morgan F4; now there’s an idea. My first car was an F4; great fun.
If you’re building an EV or converting an existing car, why settle for ordinary when you can create something extraordinary? Enter the Emrax 348 electric motor—one of the most impressive motors available today. Whether you’re using one, a pair, or going all out with four, the numbers are jaw-dropping:
Emrax 348 Quick Specs:
Dimensions: 348mm diameter × 110mm depth (about the size of a wheelbarrow wheel).
Torque: 1,000 Nm—nearly as much as a Bugatti Chiron (1,600 Nm), so a pair of Emrax motors surpass it. Of course, the Chiron has a gearbox, but still.
Power: 500 hp per motor (1,000 hp for a pair). Although output is halved after 2 minutes, that’s more than enough if you’re hitting 100 mph in under 7 seconds.
Max Revs: 4,000 RPM—this limits top speed and influences gear ratios, making it a balancing act between acceleration and top speed.
Design Objective:
Create a modular unit that combines suspension, steering, braking, and drive—all in one elegant package. The idea is to keep it compact and cost-effective, but versatile enough to be used on any corner of the car.
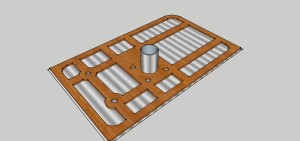
The core of the module is a CNC-machined aluminium plate (approx. 60×40 cm). Mounted to it are:
Unequal-length wishbones shorter upper arms – longer bottom arms bolted at the rear through slots.
A universal hub carrier (e.g. Brypar Motorsport) for flexibility in steering geometry and the strength of Porsche-grade hubs and bearings.
Brake discs mounted close to the plate with callipers fixed directly to it, minimising unsprung weight.
Electric motor + bevel gear drive: Instead of mounting the reduction gear and motor inline (which causes width and cooling problems), we use a bevel gear connected to a short, angled prop shaft. The drive motor is then mounted elsewhere, anywhere along an arc—say, on the rear bulkhead behind the back seats —improving cooling, packaging, and polar moment of inertia. The gear ratio can be changed very quickly just by exchanging the whole bevel gear housing.
The suspension uses a pushrod-actuated rocker linked to a spring/damper mounted along the top of the plate—neatly tucked away and easy to tune.
Performance Examples:
Two-Wheel Drive:
Cap your top speed at 150 mph and the gearing and torque gives around 1.4 tons of thrust at the wheels. If your car weighs more than that—and most EVs do—you won’t hit the 1g needed for a 2.5-second 0–60 mph time although circa 3 seconds would be a reasonable expectation. So while a 1,000hp car will be pretty spectacular, to graduate from supercar to hypercar territory, you’ll need four-wheel drive.
Four-Wheel Drive:
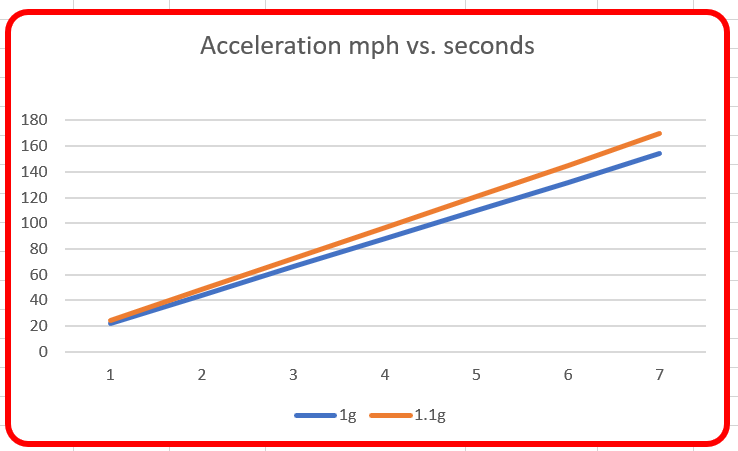
Use all four corners, and with a tyre speed rating limit of 186 mph, you’ll get 2.2 tons of thrust (or 2.67 tons if limiting top speed to 155 mph). With a 2.2 ton car that translates to 0–60 in 2.5 seconds—now we’re talking hypercar credentials. Tyres are usually grippy enough to allow acceleration of at least 1g. The chart below shows how long that takes to reach various speeds. Unfortunately, the faster you go, the more wind resistance bends those lines; even so, 0-100 in 4 seconds looks like a realistic target.
Braking Considerations:
Even with regenerative braking, powerful cars still need strong friction brakes. Freed from the constraints of wheel diameter, the brake disc can be as large as needed—and even have a second calliper. That means you don’t need massive wheels just to fit oversized brakes. Big discs and double calipers make no difference to unsprung weight – perfect.
Final Thoughts:
These integrated modules are perfect for developing a powertrain test mule. Any sturdy hatchback will do. With most of the engineering already solved, you can jump straight into drivetrain testing without reinventing the wheel.
And because they’re stealthy, we’re entering the golden age of Q-cars. That humble Citroën Berlingo sketched above? It could quietly hide 2,000 hp. Why the Berlingo? There’s loads of room in the nose for front motors, even more in the back, and already wide wheels with arches ready to take bigger tyres. Inside, you’ve got ample space for batteries, telemetry, and more. Why sit on the floor of a cramped supercar when a roomy Berlingo is just as quick?
In case you were wondering, the McMurtry Speirling fan car does 0-60 in 1.4 seconds – but you can’t get a sofa in the back.
Sadly, not many niche sports cars are left now. Spiralling labour and material costs have turned what once were affordable cars into expensive toys for the few.
But a new technique could literally halve production costs and it’s fast too.
Furthermore, it is particularly applicable to electric cars, but let’s look at the traditional side first.
Usually, body panels are fixed onto complex wooden or steel-tubular frames along with lots of hammering and welding and many expensive man hours.
Intrinsically these techniques are very good. Wooden frames (Morgan, Marcos) can be surprisingly strong. The largely wooden WW2 Mosquito flew with a massive Merlin engine on each wing and you can’t get much more demanding than that.
Space frames are almost universal (Caterham, TVR, Westfield, Donkervoort, Maserati etc) and with body panels attached they are remarkably strong and light – if only we could get away from the labour-intensive procedures involved.
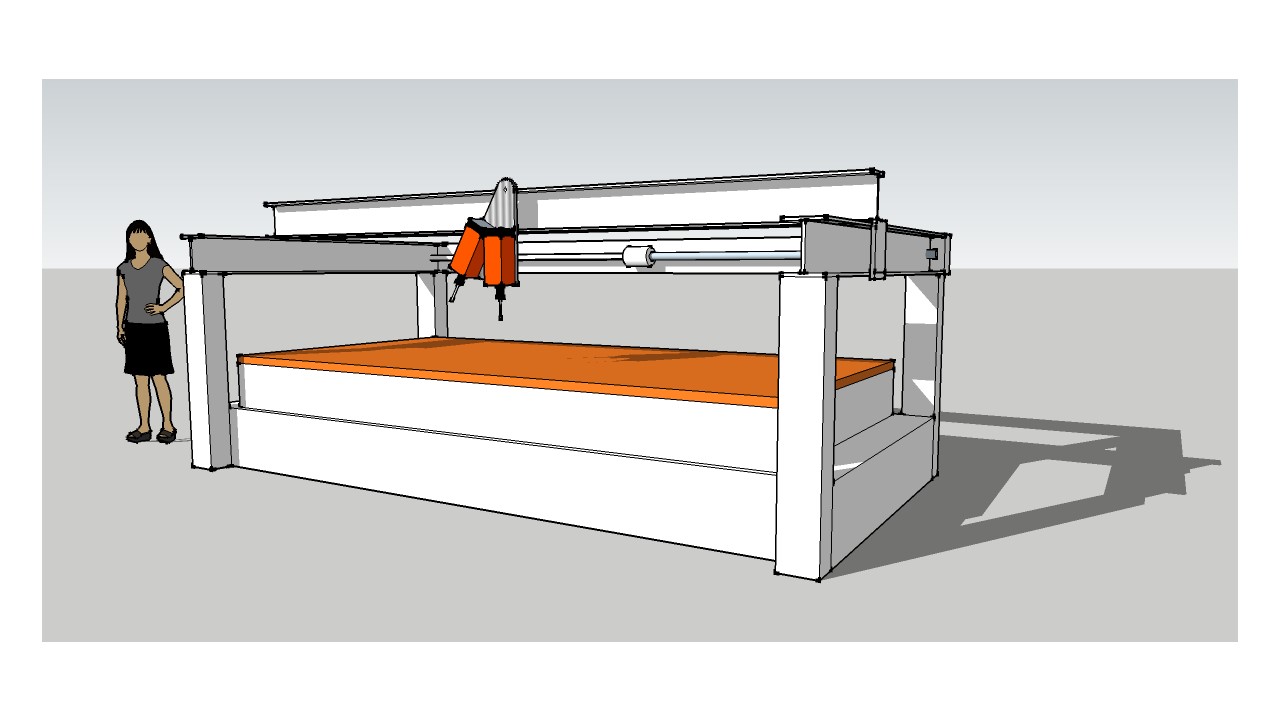
As it happens, we can combine complex wood and metal frames with attached body panels quite easily. Furthermore, it can be done with great speed and accuracy and all automated too.
It all starts with a sandwich. A sheet of aircraft-grade birch plywood and an aluminium sheet glued together.
With a CNC router, machine away the plywood to leave complex shapes and struts to give strong, light and complex components. Any mounting holes or slots are accurately placed in seconds. Note how the aluminium body panels are already glued to the formed struts.
Next, a CNC laser cutter swiftly cuts through the aluminium sheet to separate the various components; deliberately exposed flanges can be peened over to increase strength and appearance.
Note that, at this stage, all the teams of tappers and welders have been replaced by a couple of CNC machines. Often the machines are beavering away with no one there at all – might as well turn the lights out then.
So far so good but this technique can be taken so much further.
Back-to-back panels
Panels can be doubled up with wood sandwiched in the middle and aluminium outsides. Immensely strong components are the result and with attractive curved edges if required. For example, a side body panel now strong enough to double as a chassis.
To enable through-bolts to be tightened without crushing the wood there will be plug pairs inside with a star washer in between to further transmit any applied load into the wood.
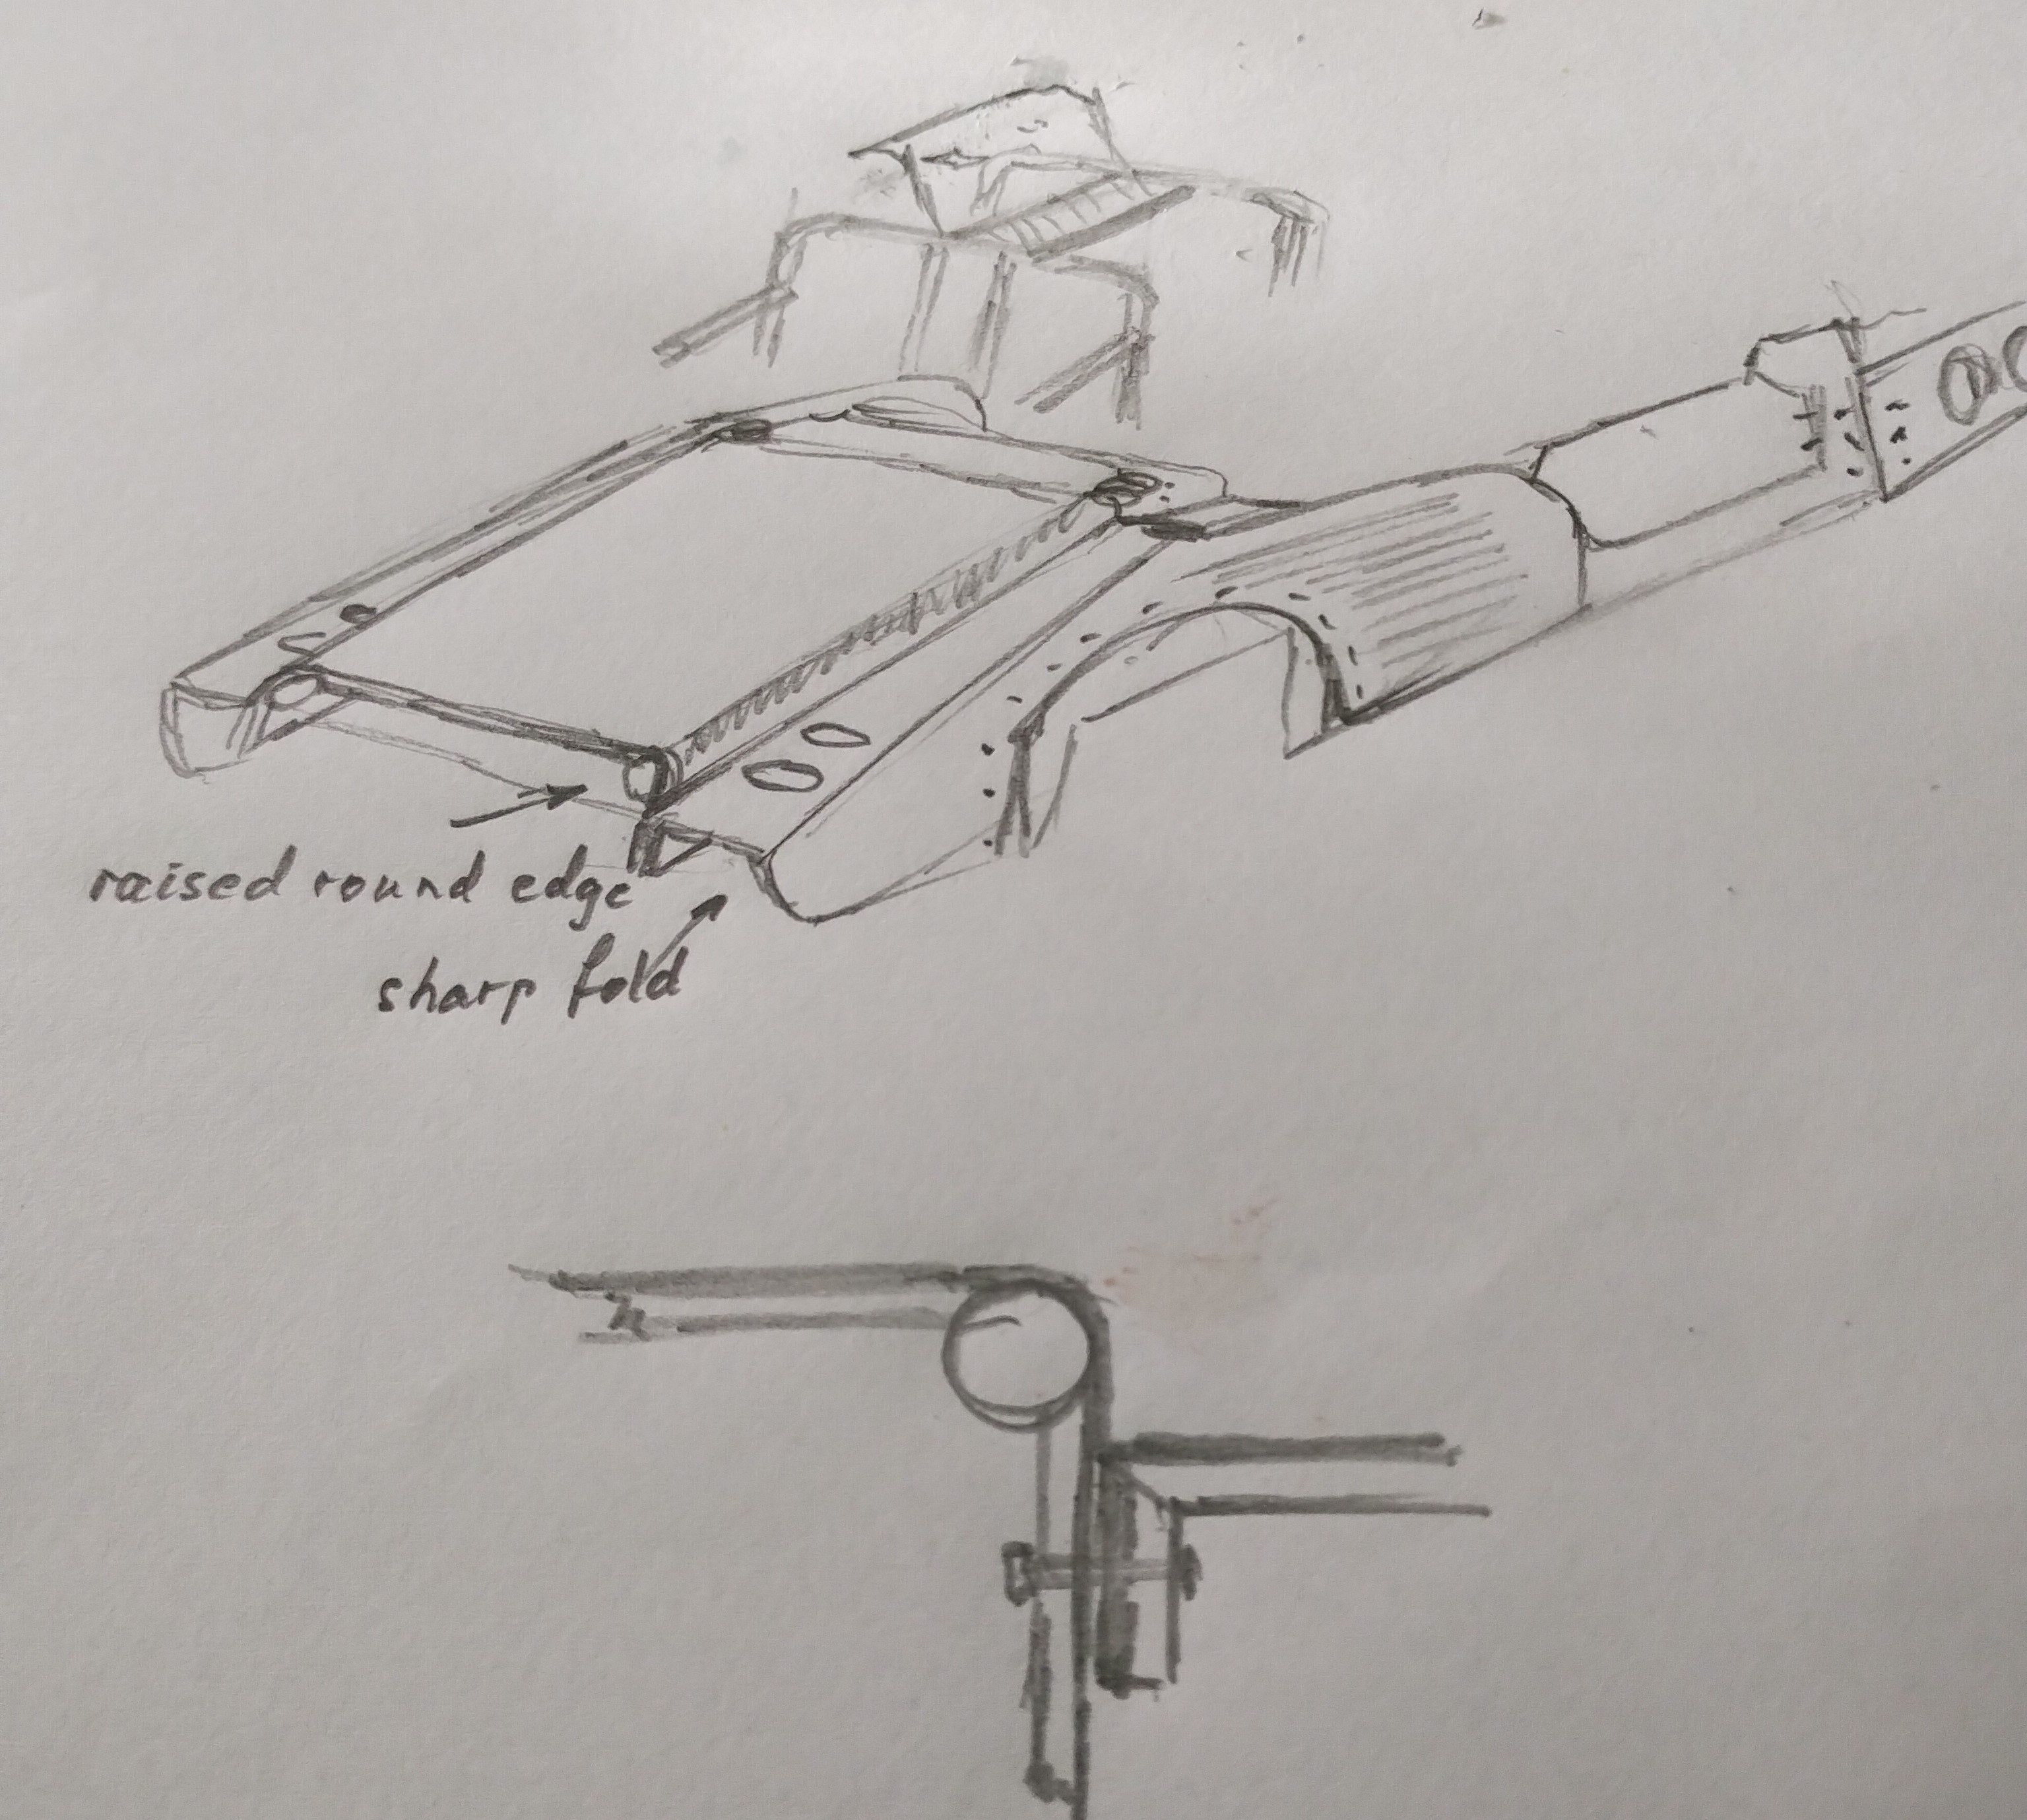
Folds
Machine a ‘V’ groove into the wood and the panel can be folded along that line using the aluminium as a hinge. This enables structures to be more than two dimensional and makes seamless direction changes possible. Rounder corners are also possible by wrapping the corner round a tube which is not only attractive but offers a useful conduit for wires, brake lines etc. You’ll see on the example below that all the seams are folded inwards so that when the panels are bolted and glued together the outside finish is clean aluminium.
The fold-round-a-tube concept could be significantly extended. If that tube was part of the steel tubular sub-structure then the added strength of the panels would be significant. For example; the roll bar supports in the rear section would make immensely rigid braces for the rear subframe.
Note that the rounded corner allows room for a press to make the bend accurately and the power allows more choice of cover materials; stiffer ally for example or even stainless steel. Not all the bends have to maximise strength though; a plastic coat is cheaper and allows for interesting printed finishes or even wraps. Interior panels can be leather wrapped even at this early stage in production.
Angles and joins
The basic sports car shape is a box at the back and a tapered front section. This leads to an angled joint, often between separate sections, and this will require an angled plate, or two, to be bolted across the join. As this is usually at the front bulkhead there is scope to make the plates in steel welded to a roll cage/screen frame. If you have to keep it neat, a plate can be fitted right inside the sandwich but obviously it can’t be welded to anything.
Centre console
This centre console has side panels with appropriate slots inside to take flat slats across. With our trusty router we’d machine all the switch holes etc in the flat and then bend the ally to fit slats to slots. Wood veneer on the outside or ally? Decisions. You can see that an expensive looking centre console is actually just a trivial machining exercise done in a few minutes.
The old ways – but obsolete?
I’d start with Mazda MX5 subframes with all the suspensions diff etc attached. From a production point of view having all these components added to the car with a few buzzes of a nut spinner is a huge plus.
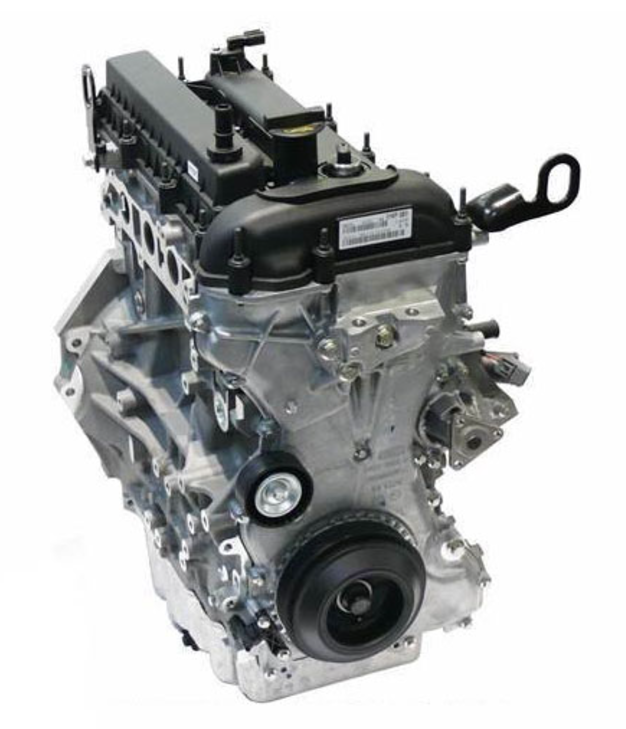
Sticking with Mazda theme a Ford Duratec 2.5 four-cylinder engine is the obvious choice. With VVT this engine goes from a docile traffic crawler to a mad screamer, all at a low price.
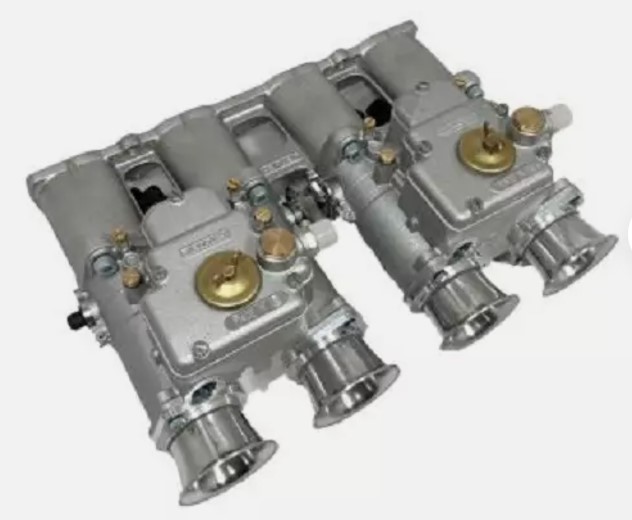
Give it the period look with Jenvey Webber 45 DCOE replica throttle bodies which, along with a few mods, will be good for 240bhp.
Apart from being a perfect engine choice, it already sits on the MX5 subframe and bolts up to one of the best manual gearboxes available. There is a good chance that the standard propshaft will fit too. Supercharging (Sprintex) can add well over 100bhp but that’s hardly needed for a light road car – or is it?
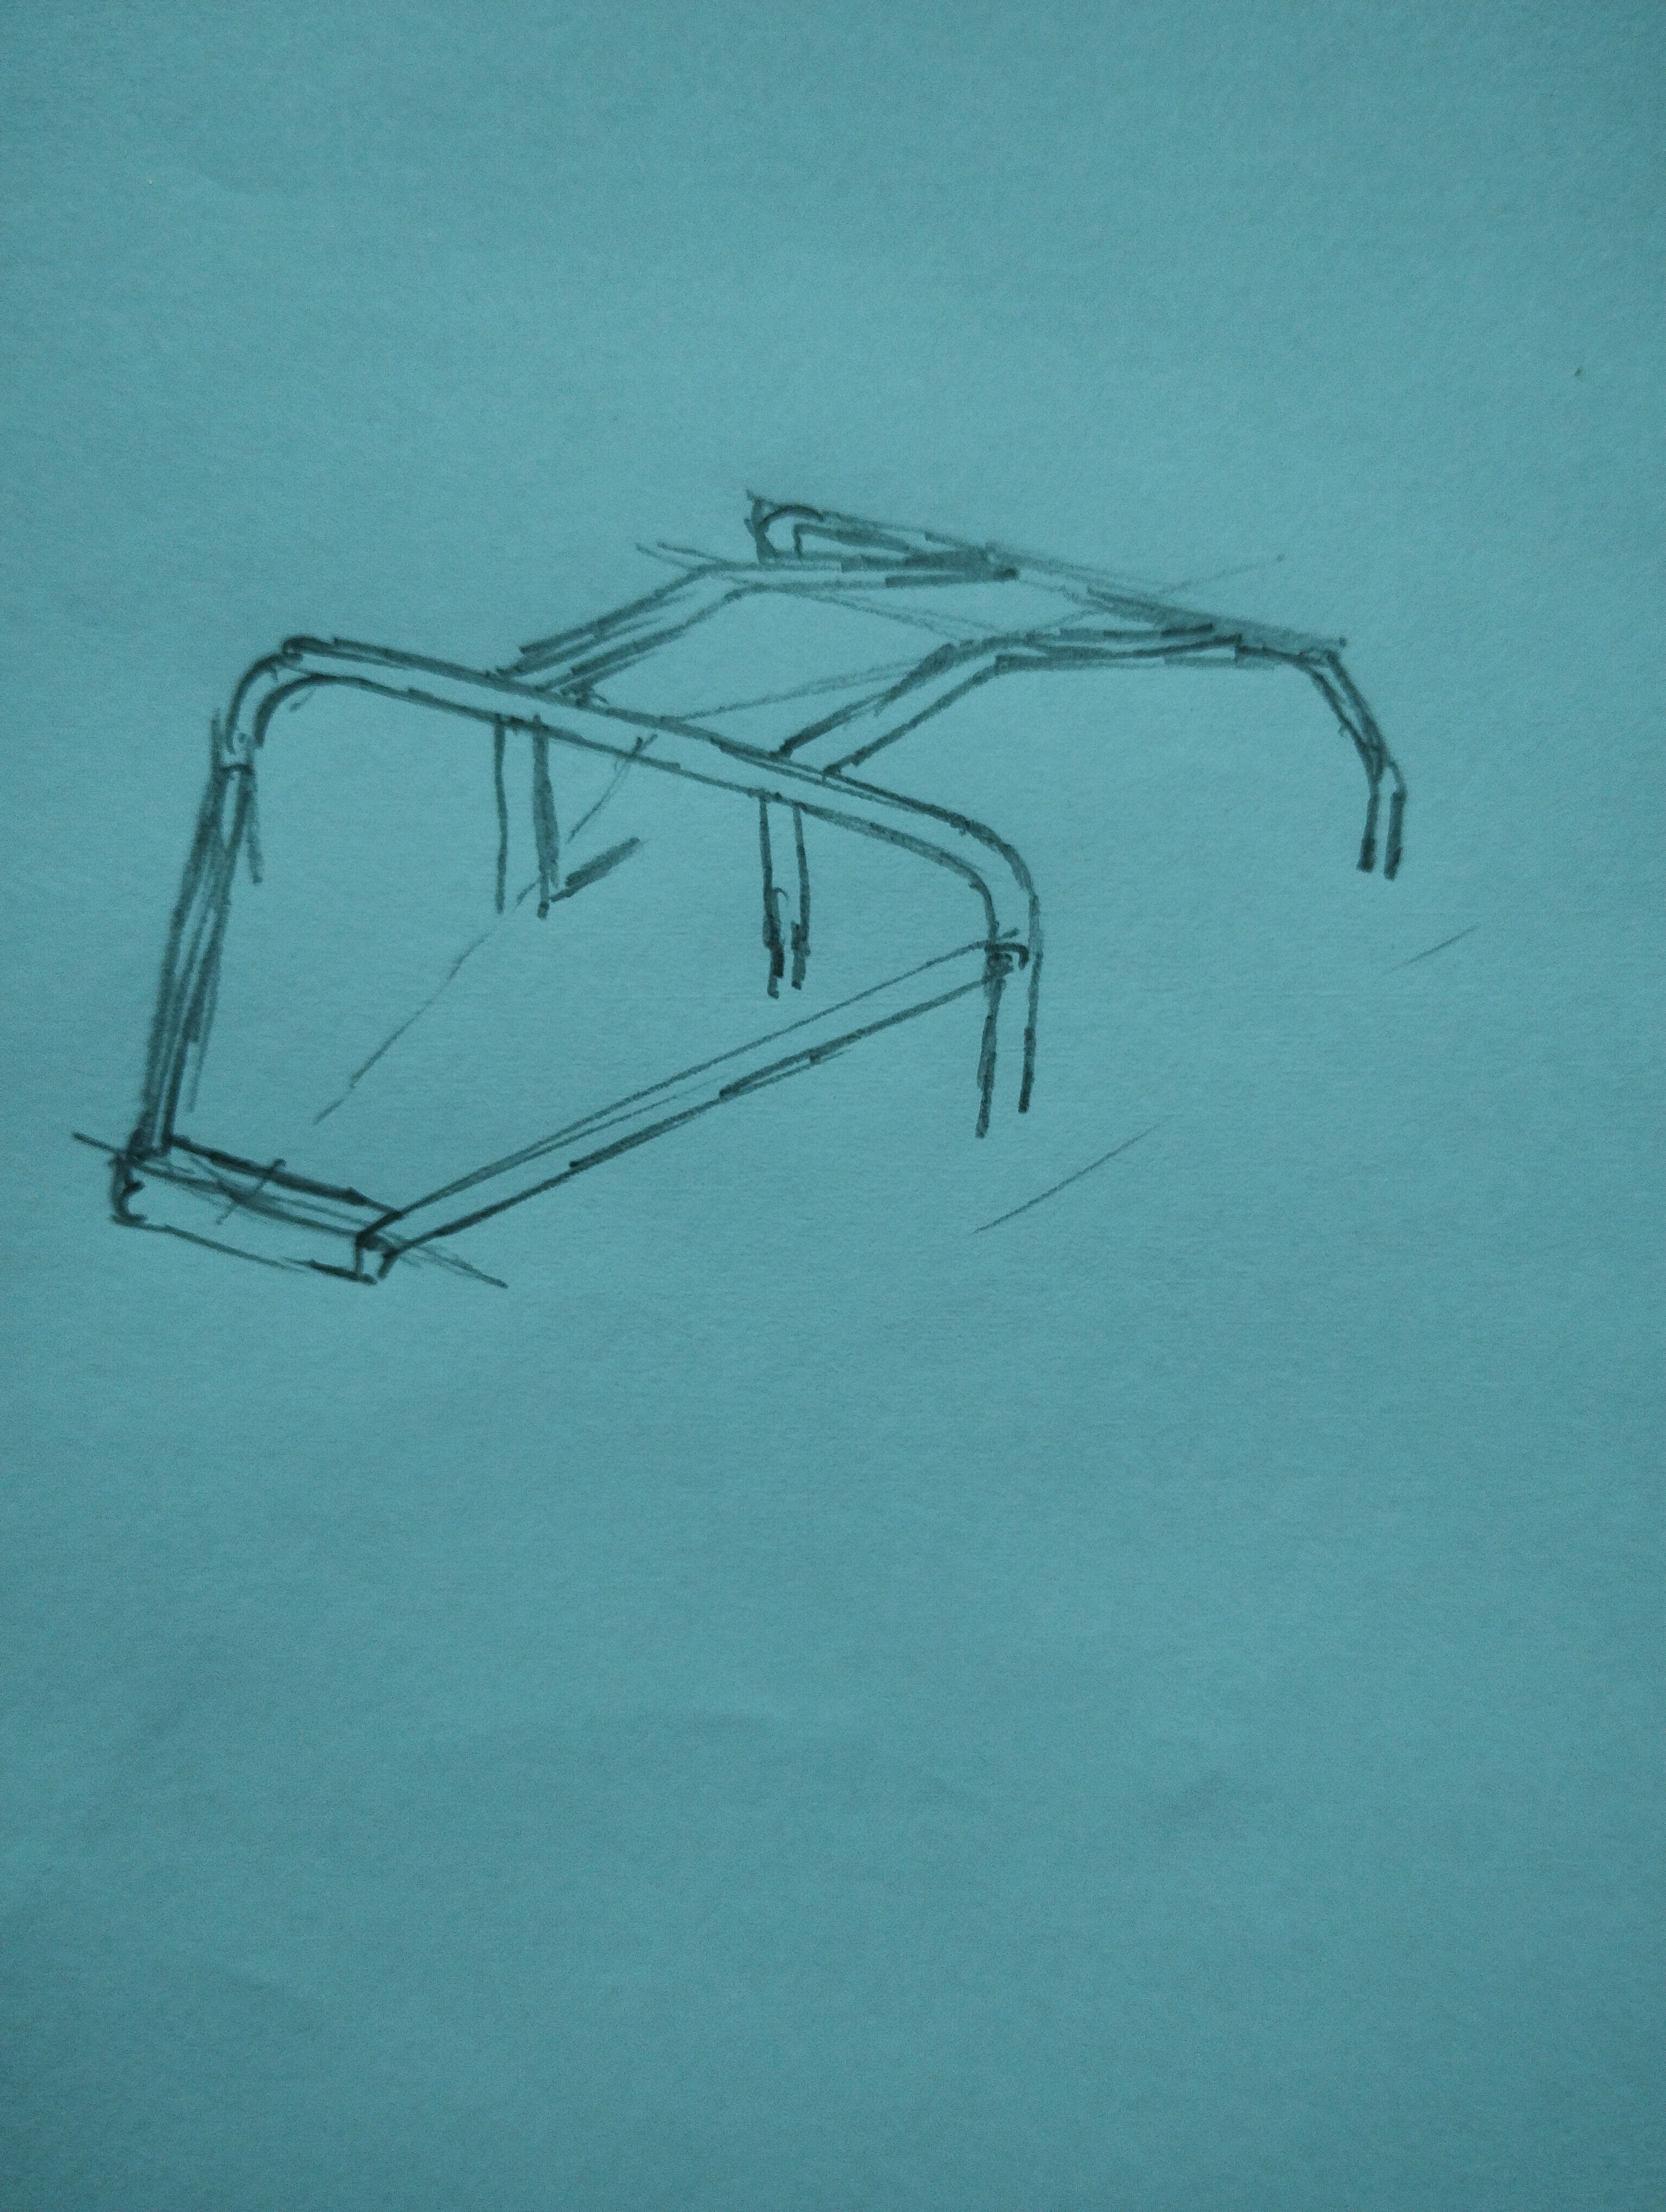
Very fast open top sports cars are downright dangerous. The trouble is you can arrive anywhere very suddenly, and at speed, which catches out other road users and increases the chance of an accident. So yes to front and rear roll hoops. Connecting tubes down the middle of the car roof add a radical increase in rigidity. The usual wood and aluminium wrap around the tubes gets a targa top finished off with openable and removable polycarbonate roof panels, as sketched previously – instant access for tall drivers at last. Of course, the underside of the roof panel would be machined to take a dash cam, switches and lights – just like a fighter jet then.
Extras – CNC machining already adds huge labour saving value to the panels and this can be taken much further. For example, side panels could have brake lines trapped neatly in the sandwich and the same for wiring too. Pockets for loudspeakers are simple to incorporate; just a few more lines of code for the CNC router. Each panel would become a sub-assembly in its own right and this enables the final assembly of the car to be much quicker and neater.
Just by removing wood air ducts can be pre-machined inside the sandwich and this begs the question; could all the components for a heater be incorporated into the dashboard? The external blower just leaves the heat exchanger to fit. Ducts lead to manually adjustable outlets such as the eyeball jobs seen on Cortinas.
You know that brolly hidden in the door idea? A few seconds extra on the CNC so why not?
The laser cutter can make a complex logo in seconds; polycarbonate backing with press fit LED bulbs completes the job. There are no particular restrictions on size so, for example, a huge logo on the back of the car could double as a brake light.
Wings, cowl, seats, heater etc etc – If you are a manufacturer with these on the shelf for an existing car, that would be a good start! I once saw a classic car that was entirely polished aluminium and chrome; might have been an SS Jaguar. Anyway, it looked absolutely fabulous and that look is possible here.
Electric Vehicles
The incredibly light but strong panels described above are perfect for electrification. It’s all about how the loads are fed into the corners via panels that double as chassis members..
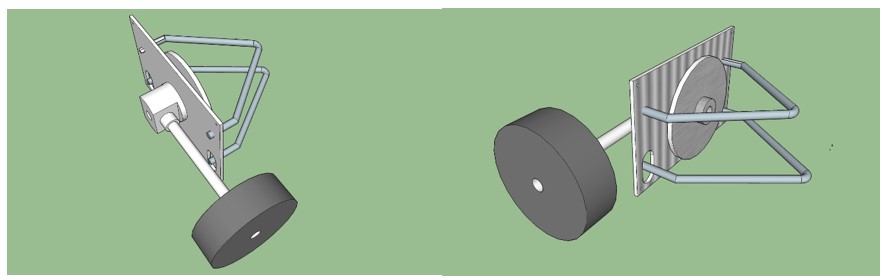
The flat plate concept
Take any corner of the car and start with a flat plate. On the back of it bolt on an electric motor. On the other side goes a brake disc with its caliper bolted directly to the plate. Unequal length suspension wishbones have mounts bolted to the front and back of the plates and a coilover mounted at the top. That’s about it; all rather neat, simple and cheap, and incorporated beautifully with the body panel which goes between the motor and the plate. Remember, the brake line is already embedded in the body panel so that’s neat too. The motor is brought inboard and protected from the elements. Note the benefits to unsprung weight with inboard brakes. To prevent excess heat from the brake disc being conducted to the motor it will be necessary to space them apart with a coupling in between. The chassis/body panel will also provide some separation and conduct heat away too. Bear in mind that regenerative braking takes away a lot of energy and also that the brake disc can be as big as is needed without having to fit inside a wheel – plenty of space for another caliper if needed.
Talking of cooling; any ally clad panel with Alupex pipe inside (like underfloor heating) would make a cheap oil cooler – not particularly efficient but very neat and dragless too.
Would the plate concept be cheaper to build? Those complex subframes for example – gone. Engine, gearbox, propshaft, diff, all gone. Of course, the neatness of this arrangement easily allows rear-wheel drive or four-wheel drive where 0-60 times under 3 seconds are realistic.
N.B. We still need a deep propshaft tunnel for strength – good place for some batteries. Low polar moment of inertia and all that.
Embedded wires concept – A few motors and battery packs all need heavy wires to connect them. Our flat panels can replace wires with thick aluminium ribbons trapped inside. This could even be like a ring main all round the car; batteries feed in, motors (via inverters) take out, with hardly a wire in sight. Of course, extra strips of aluminium inside body panels all add to the strength; structural wiring! You heard it here first.
Summary – A quickly assembled set of panels make an incredibly light but strong basic body which is so inexpensive it’s hard to see how it would cost more than £2,000, and don’t forget, it does away with a chassis and comes with every mounting hole placed with precision accuracy. Based on an assembly of flat panels it is exceptionally suitable for older style vehicles. Combine all this with the flat plate drive/suspension units and electrification looks like the way ahead.
P.S. Forgive me for trawling through the traditional concepts first but, by contrast, it shows how the electric version is so much more exciting and so delightfully simple that it sweeps away all those old ways of doing things. More on the flat plate concept here
CNC routers – If that’s a new world to you I’d recommend CMS from Italy. I’ve used one with six 20hp router motors and twin tables – an awesome beast.
If you fancy the Grand Designs Heating System but need a bit more power for a bigger house then you are in luck; bigger is even better. Rather than scaling up the ground source heat pump we can add one of the latest high temperature air source heat pumps to the mix.
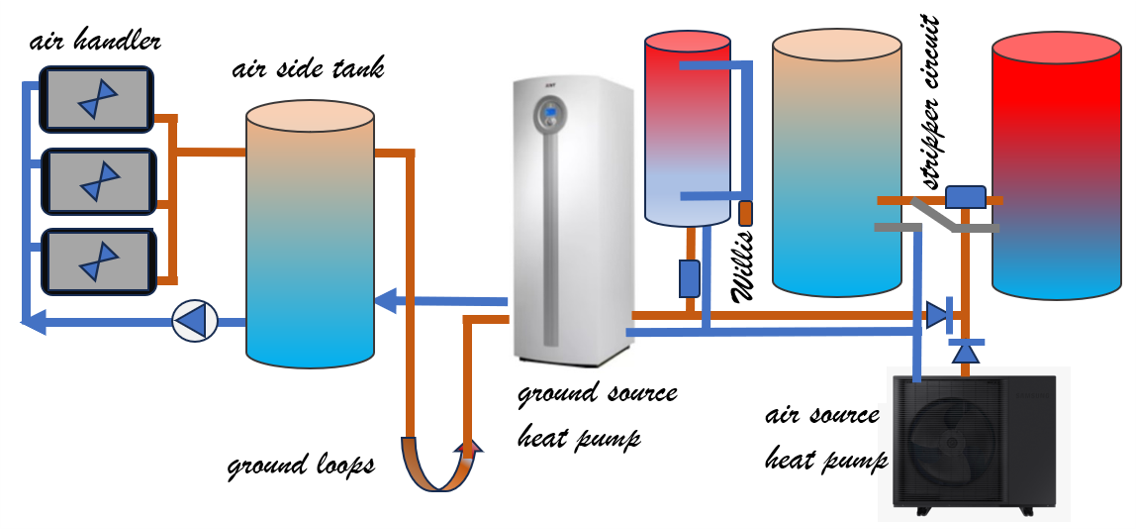
That way we get the best of both worlds with the GSHP taking care of the cheap rate nightshift and the ASHP maximising efficiency with warmer daytime air. Both heat pumps can run together when needed and this layered approach will satisfy the heating seasonal demands of a wider range of houses. Heating with this system is unusually flexible. With energy stored in oversized buffer tanks, the heat delivery is governed by the rate at which it is pumped to the various emitters and not directly determined by heat pump power; it is even possible to exceed the power of the heat pumps for short periods.
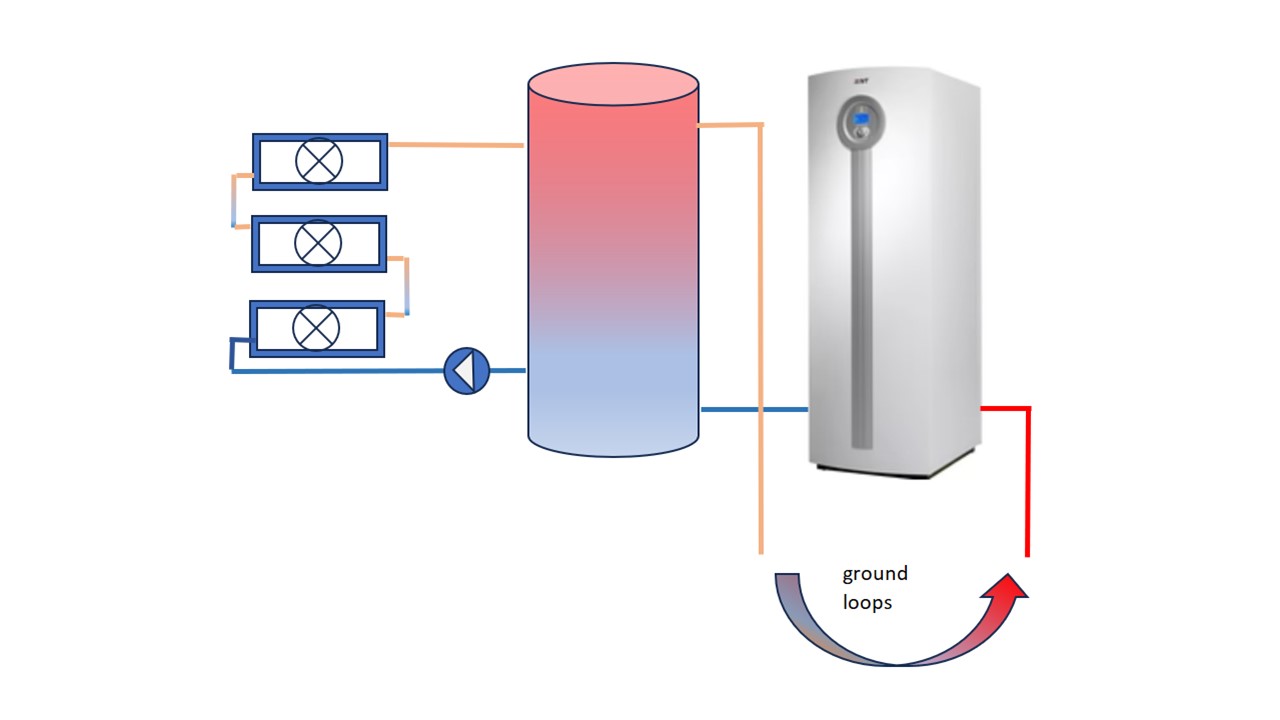
Above is the heat pump pipework. All the input to the tanks is via coils except the air side tank (on the left) which is direct. We’ll go through this, bit by bit, and you’ll see all the clever stuff emerge.
Running largely at night and avoiding all the cold air and defrosting malarky that would plague an ASHP a ground source pump is the starting point. GSHPs produce slightly better seasonal COPs than ASHPs but we can raise that even more by putting extra energy back into the ground.
Concept number one:
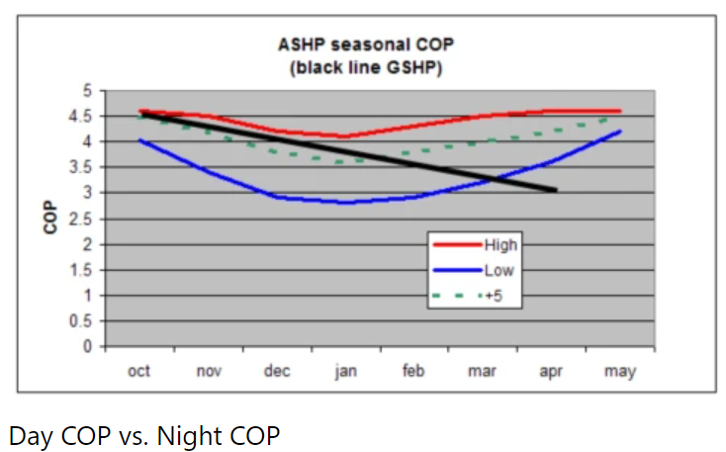
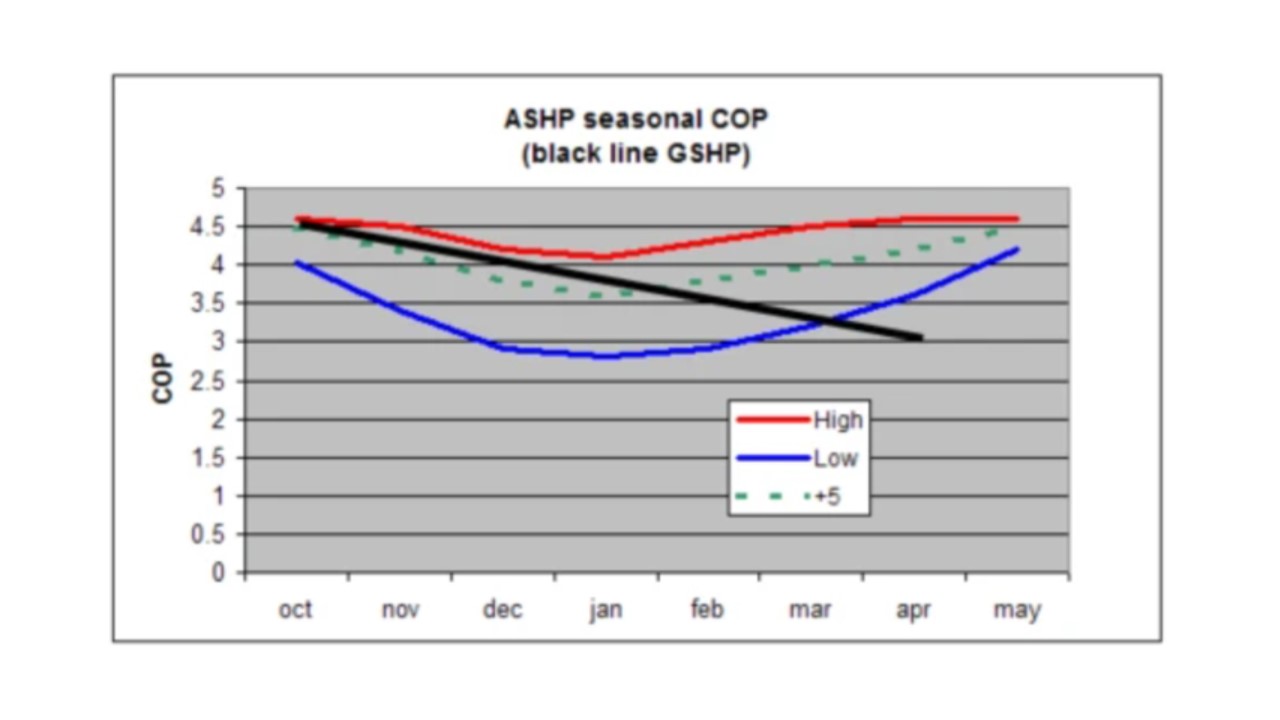
This chart compares the COP of a GSHP with the COP variation of an ASHP over the winter months. The wide swings in air temperature vary the COP of an ASHP hugely (the area between the red and blue lines) and show how day time running might be a lot better than night time. The black line for the GSHP is steady but declines as the ground is cooled by the season as well as the demand from the heat pump. Note the huge difference between the blue line and the black line which shows why ground source heat pumps are generally better.
Our system seeks to ignore that horrible blue line (i.e. don’t run the ASHP at night) and to operate around the red line and the black line. Those lines diverge after January where the ground gets colder and day time temperatures start to recover and it then makes sense to focus on daytime running of the ASHP. Here comes the big concept. We can also grab some of the day time warmth to benefit the GSHP and flatten and lift the black line to a COP of around 4. We do this with a tank and some air-to-water heat exchangers, shown on the left of the diagram above.
Here’s how it works. The outlet flow from the GSHP is typically around zero degrees, or colder, so the ambient air is nearly always warmer, especially during the daytime. The heat in the air is captured with three car type radiators and fans and circulated into the large buffer tank. This water goes to the ground loops whenever the heat pump and its circulation pump runs. There will be times when the tank is actually hot enough to feed energy back into the ground. Imagine a nice sunny day when the tank has been independently spooling up to 12c or so and the heat pump starts up and dumps 1,000 litres straight into the ground loops. This won’t happen often but the ground will rarely be fed temperatures below zero. Generally the ground loops will start off warmer and in warmer earth. The overall result is that we take a system that is intrinsically very good and make it much better. A higher COP gives much lower bills. A COP lift from 3 to 4 produces 33% more heat for your money; it’s that significant. That’s a good starting point but we can improve a lot more on that.
Concept number two:
Off-peak electricity can be had at night (for the car charging brigade) and when that is multiplied up by a heat pump the result is astonishingly cheap energy. A 10kW heat pump running 7 hours nightly for the whole 200 days of winter delivers 14,000kW.hrs for a mere £260. Crazy but true! The maths says it all; 7.5p for 1 kW.hr boosted by the COP makes 4kW.hr – divide 7.5 by 4 and you get 1.88p per kW.hr. How good is that? Well, gas is four times more expensive and direct electricity is twelve times more expensive, so yes, it’s good alright.
But it has to be stored ready for the next day, hence some tanks. Two 1,000 litre tanks for 2,000 litres of heating storage.
Although the ASHP is more suited for the day shift (nearer the red line on that COP chart) it makes sense to run it at night too when electricity is cheap. For example, near dawn while the GSHP tops up the domestic hot water cylinder the ASHP can be supplying much hotter water to the hot cylinder (red one on the right of the picture) for morning use on towel rails and fan-coils. The system can also be heating the concrete floor slabs at the same time so that’s more power used and stored.
Concept number three:
The stripper circuit
I developed this idea to preserve the precious heat in the hotter tank of a two tank system. It works a treat and will lift the performance of this system considerably. Here a three-port valve diverts water to the hot tank coil – if that incoming water is hotter – and the returning water then goes through the colder tank coil where the remaining heat is stripped out. If the incoming water is cooler than the hot tank then it is switched, by a simple Dt controller, directly to the cooler tank coil. So, if the supply from either heat pump was on a low set point, say to run the floors, then the hotter water tank, with its precious high grade heat, would be left undisturbed. That hotter tank could also be heated further by a wood burning stove or a gas boiler (directly, no coils) – and that’s where they go if needed. They say that you can’t combine low temperature heat pumps with additional high temperature sources but they are wrong. This does the job perfectly. A wood burner might be high on your wish list especially if you have access to cheap wood. A gas boiler is also a desirable addition to the stack of power sources, providing masses of high grade heat and adding to the overall system reliability.
Day time electricity is much more expensive but solar panels can help to run the ASHP fairly cheaply (or free) and that high, warm day, COP makes a big difference. Don’t forget, the stored energy might be enough to get through most days without any additional heat at all. That’s the benefit of having two lower powered heat pumps – you are more likely to be able to run one free on the solar panels. Of course, on really cold days both pumps can run together and along with any stored energy there will always be enough power.
Transmission
Lets now add a few more pipes to the two big tanks on the diagram. With masses of cheap heat parked in them, sending it to towel rails, fan coils in bedrooms, under-floor downstairs and in bathrooms is all easier than usual. All independent of the heat pumps and fully timed and zoned. If the diagram looks simplistic it’s because it really is that simple.
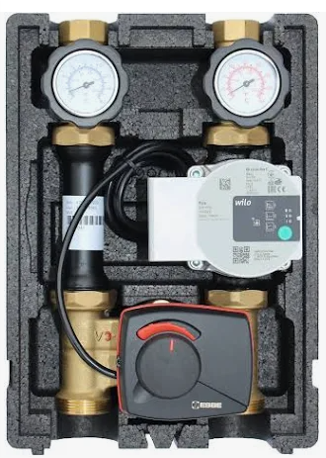
ESBE mixer unit
This blends down the big tanks to suit the under-floor pipes and it does weather compensation too. Normal UFH mixers are fixed at one temperature but ESBE mixers vary according to the outside temperature and adjust the power of the heating as necessary.
The towel rails and fan-coil units are separately fed by pump(s) and timers and there is no problem with zoning them as much as is required. If any radiators are used the hotter ASHP will cope with these too but they are best avoided.
Naysayers will now be saying that buffer tanks are inefficient or that heat pumps should run 24/7 or that zoning does not sit well with heat pumps. They are right on all counts but that misses the point; our system is so efficient and cheap to run it easily trumps any minor gains elsewhere.
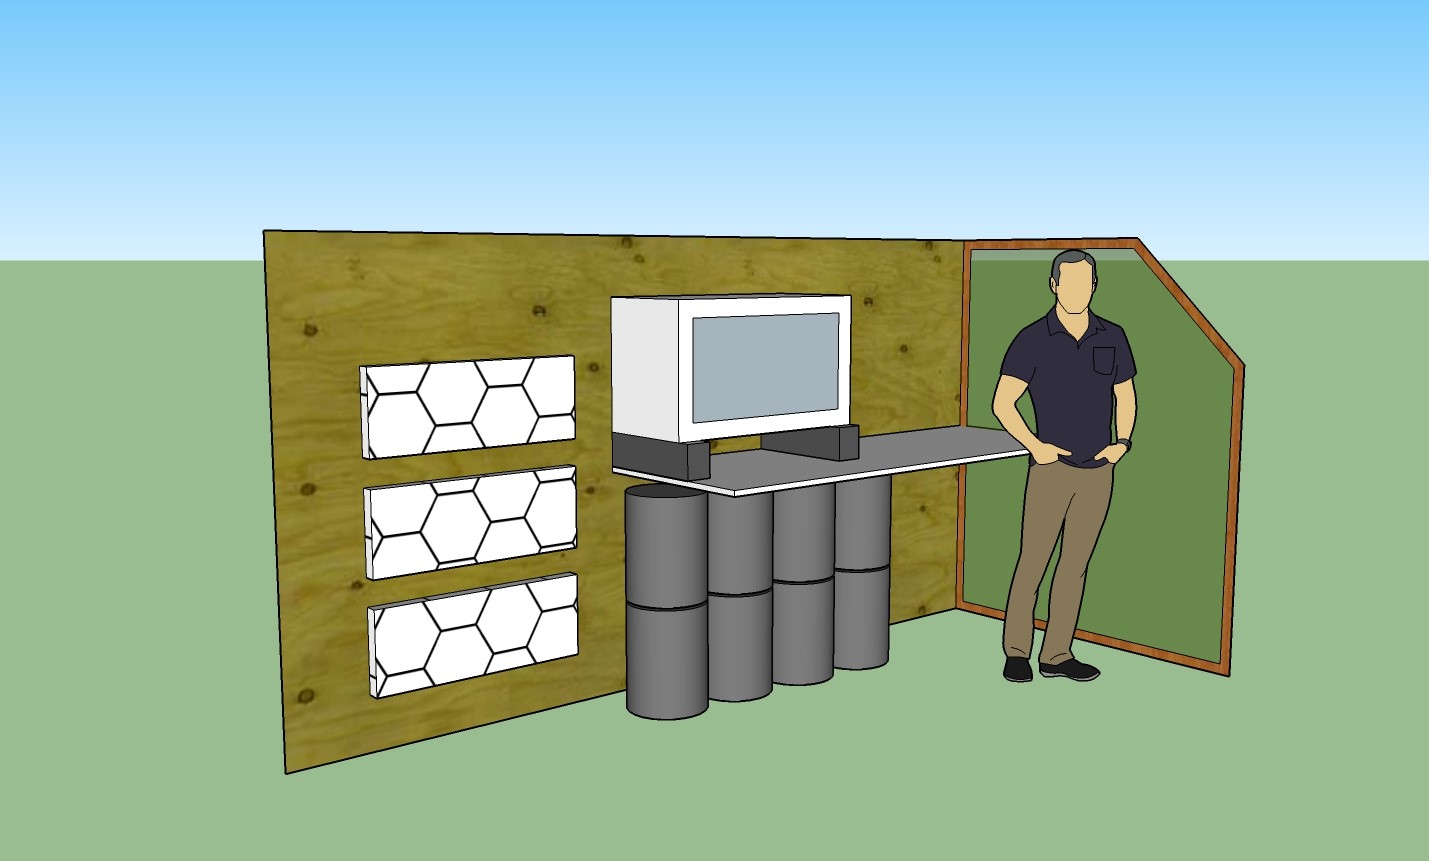
The tanks – all from OSO
The tech room will look rather impressive with three 1,000 litre tanks. One will be for the air side of the hybrid heat pump and the other two for heat storage. A fourth tank is for domestic hot water. (300 litres with a 3msq coil for heat pump compatibility).
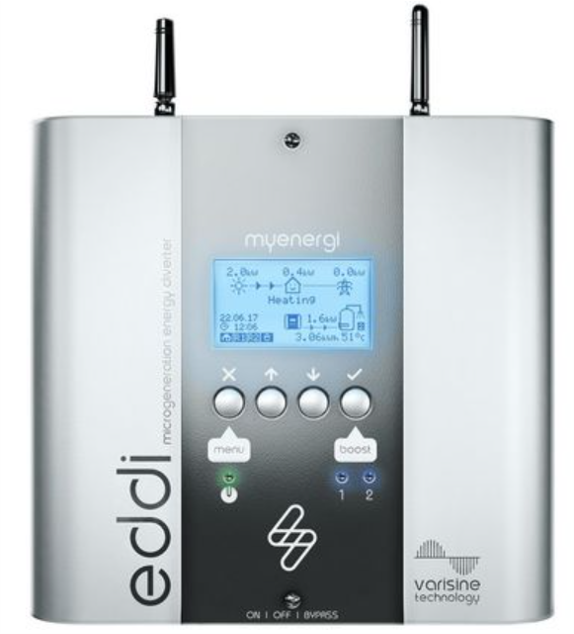
EDDI solar diverter
The GSHP can produce hot water cheaper than a direct immersion heater but the EDDI picks off solar excesses in short bursts during the day and runs the tank up to much higher temperatures. The heat pump will be all the better for not firing up all the time, the legionella will get regularly fried and a higher temperature effectively makes the tank size bigger; so wins all round.
Willis remote immersion heater
I like these because the circulation past the immersion element keeps the thermostat from shutting down under its own heat and also tank loading is straight into the top to maintain perfect stratification. Tank fitted immersion heaters can short cycle frequently and are harder to service too.
Air conditioning
Mmmm, how to mix heating the hot water cylinder with cooling the house? Easy actually; the GSHP and the Eddi do the hot water and the ASHP does the cooling of the floors etc. Both at once if you like. While this is technically possible I’d favour separate fan coil units which not only do cooling but add to the energy stack.
Solar panels + Enphase IQ8 micro-inverters
Each panel has its own micro-inverter for long term reliability, performance and also power if the grid fails – you know, in a Zombie Apocalypse scenario. At least 18 panels (about 7kWp) would often keep either heat pump running during the day. Each heat pump draws just over 2kW so the panels should have that covered.
Electric car
It’s hard to get cheap off-peak electricity combined with a decent export rate so the car makes a good soak for any excess. You no longer buy petrol so that’s just as good as any export payments. N.B. There are no domestic batteries in our system – the money is better spent elsewhere. When the technology matures the car will be the battery anyway.
Solar tech room
This is just a fancy tweak – you don’t need this as part of the system; be cool if you did though.
All those car radiators and the ASHP would be neat and more efficient in a dedicated shed with glass sides for some solar heat. If possible, on a flat roof would be good. Apart from being neat and tidy the solar side helps to avoid the ASHP defrosting cycles with that bank of solar warmed water barrels. There is a COP lift too.
Summary
You’d need a huge house to justify all this but if you are in that fortunate position this maximises cheaper energy along with the versatility to cope with any demands. Some heat pump installations can be disappointing but this so simple and powerful there is no fear of that here, indeed you might have the best system ever devised.
Could this super cheap heating scale up for a really huge house? Absolutely, with reasonable capital costs and, with multiple power sources, better reliability too. Both heat pumps could go up to the next common size – 17kW each and then, if that’s still not enough, you could double up with two of each for a total of 68kW. More? Well, don’t forget that the hot tank is designed to receive direct heat from a gas boiler and/or a wood burning stove so if you need 100kW or more that’s no problem at all.
Compared with , say, a wood chip burning furnace this system is not only cheaper but easy to run reliably with lots of redundancy built in. Best of all though the extreme efficiency will get those bills down to levels you’d hardly believe.
There are a couple of significant heating ideas already featured on this site. One, the hybrid combined air/ground source heat pump, where a ground source pump has a connected tank warmed by the ambient air. And the other where big water tanks store cheap off-peak energy.
The first concept produces astonishing coefficients of performance and the second produces astonishingly low bills.
For the Grand Designs Heating System, we’ll combine these concepts and serve them up as a benchmark for what is possible. Here we go.
Running largely at night and avoiding all the cold air and defrosting malarky that would plague an ASHP. a ground source pump is the starting point. GSHPs produce slightly better seasonable COPs than ASHPs but we can raise the COP even more by putting extra energy back into the ground.
This chart compares the COP of a GSHP (black line) with the COP variation of an ASHP over the winter months. We can ignore that horrible blue line and focus on the divergence of the red line (warm air days) with the declining black line for the GSHP. Our mission is to grab some of the day time warmth and add it to the mix and thus flatten the black line to a COP of around 4. We do this with a tank and some air to water heat exchangers.
The outlet flow from the heat pump is typically around 0c or colder so the ambient air is nearly always warmer, especially during the daytime. The heat in the air is captured with three car type radiators and fans and stored in a large buffer tank. This water goes to the ground loops whenever the heat pump and its circulation pump runs. The design power of the radiator/fan combination is roughly equal to the heat pump to try to keep the ground temperature from depleting. There will be times when the tank is actually warm enough to feed energy back into the ground. Imagine a nice sunny day when the tank has been independently spooling up to 12c or so and the heat pump starts up and dumps 1,000 litres through the ground loops. This won’t happen often but the ground loops will rarely be fed temperatures below zero as is typical with most installations. The overall result is that we take a system that is intrinsically very good and make it much better. A higher COP gives much lower bills. That’s a good starting point but we can improve a lot more on that.
Concept number two:
Off-peak electricity can be had at night, for the car charging brigade, and when that is multiplied up by a heat pump the result is astonishingly cheap energy. A 10kW heat pump running for 7 hours nightly over the whole 200 days of winter delivers 14,000kW.hrs for about £260. Crazy but true! The maths says it all; 7.5p for1 kW.hr on a COP of 4 makes 4kW.hrs – divide 7.5 by 4 and you get 1.88p per kW hour. Compare that with electricity which costs around 24p/kW.hr. The difference is astonishing but that cheap energy has to be stored ready for the next day, hence some tanks. Two 1,000 litre tanks combine to make 2,000 litres for the heating storage. N.B To remove that energy from the tanks we need to get the tank temperature back down to 30c or less and that will require, at least some, underfloor heating.
The stored energy might be enough to get through most days without any additional heat at all. If there is a shortfall any day time running will be much more expensive but the solar panels can help to run the GSHP fairly cheaply (or free) and that high COP makes a big difference.
Naysayers will now be saying that buffer tanks are inefficient or that heat pumps should run 24/7 or that zoning does not sit well with heat pumps. They are right on all counts but efficiency is not the point; we are using one third priced electricity which easily trumps any minor gains elsewhere.
The tanks – all from OSO
The tech room will look rather impressive with three 1,000 litre tanks and another smaller one. One will be for the air side of the hybrid heat pump and the other two for heat storage. The smaller tank is for domestic hot water. (300 litres with a 3msq coil for heat pump compatibility).
EDDI solar diverter
You could argue that the GSHP can produce hot water cheaper than a direct electric heater – the immersion – but the EDDI picks off solar excesses in short bursts during the day and runs the tank up to much higher temperatures. The heat pump will be all the better for not firing up all the time, the legionella will get regularly fried, and the tank size is effectively bigger; wins all round.
Willis remote immersion heater
I like these because the circulation past the immersion element keeps the thermostat from shutting down under its own heat. Tank fitted immersion heaters can short cycle frequently and are harder to service too.
Transmission
Towel rails, fan coils in bedrooms, under-floor downstairs and in bathrooms. All independent of the heat pump and fully timed and zoned. The big tanks make this possible and simple too.
ESBE blender unit
This blends down the big tanks to suit the under-floor pipes and it does weather compensation too. The towel rails and fan-coil units are directly fed by pump(s) and timers.
Mini-split
On warm days an air-to-air heat pump will be more efficient than the GSHP and it will be useful for topping up especially if it’s lower powered and often running free off solar. The blown warm air makes a useful laundry drier and the cooling feature sorts out the need for air conditioning. Cold air pours across the floors making a single source surprisingly effective.
Solar panels + Enphase IQ8 micro-inverters
Each panel will have its own micro inverter for long term reliability, performance and also power if the grid fails – you know, in a Zombie Apocalypse scenario. At least 18 panels (about 7kWp) would often keep either heat pump running during the day. The GSHP draws just over 2kW and the mini-split just under 2kW so the panels should have that covered.
Electric car
It’s hard to get cheap off-peak electricity combined with a decent export rate so the car makes a good soak for any excess. You no longer buy petrol so that’s just as good as any export payments. N.B. There are no domestic batteries in our system – the money is better spent elsewhere. When the technology matures the car will be the battery anyway.
Solar tech room
All those radiators and the mini split would be neat and more efficient in a dedicated solar shed. If possible, on the roof would be good. Apart from being neat and tidy the solar side helps the air powered mini-split to avoid defrosting cycles.
Conclusion
If you want your Grand Designs house to stand out and be the best of the best, this could be the way to go. What do you think Kevin?
BTW If you own a castle or something and this looks a bit light on, then check out the meaty version on
Maybe the best fan coil heater regardless of price.
If you are wondering how a heat pump might (or might not) work at all with your old radiators and pipes this might give you the answer, and it won’t cost too much
Underfloor heating did away with horrible radiators, and we don’t want them back, so that just leaves warm air blowers such as kickplate heaters and bigger fan-coil units – i.e. hot water powered puffer heaters.
A kickplate heater can give an occasional guff of hot air and they cost under £200. However these neat little units aren’t perfect. They have to shift a lot of air through a small aperture so they are intrinsically noisy, draughty and the heat exchanger, or a filter, can clog with dust and pet hair fairly quickly. Larger fan-coil units are available but they aren’t so neat and they are much more expensive.
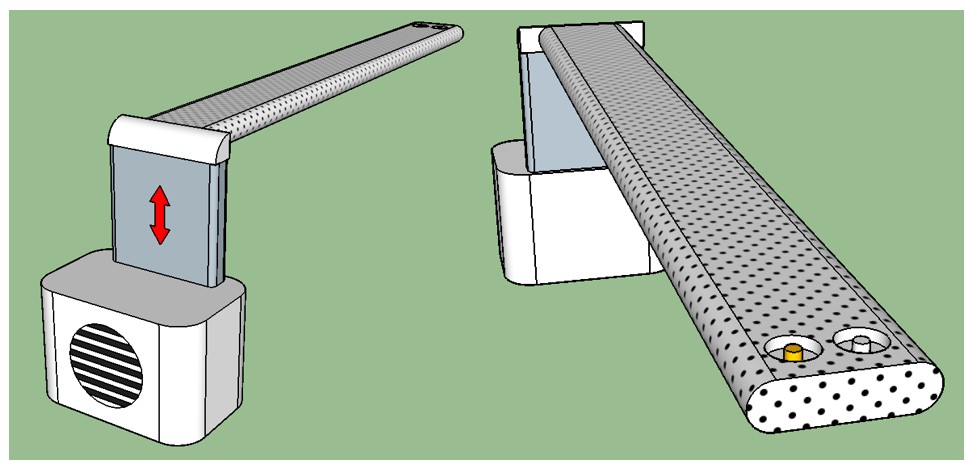
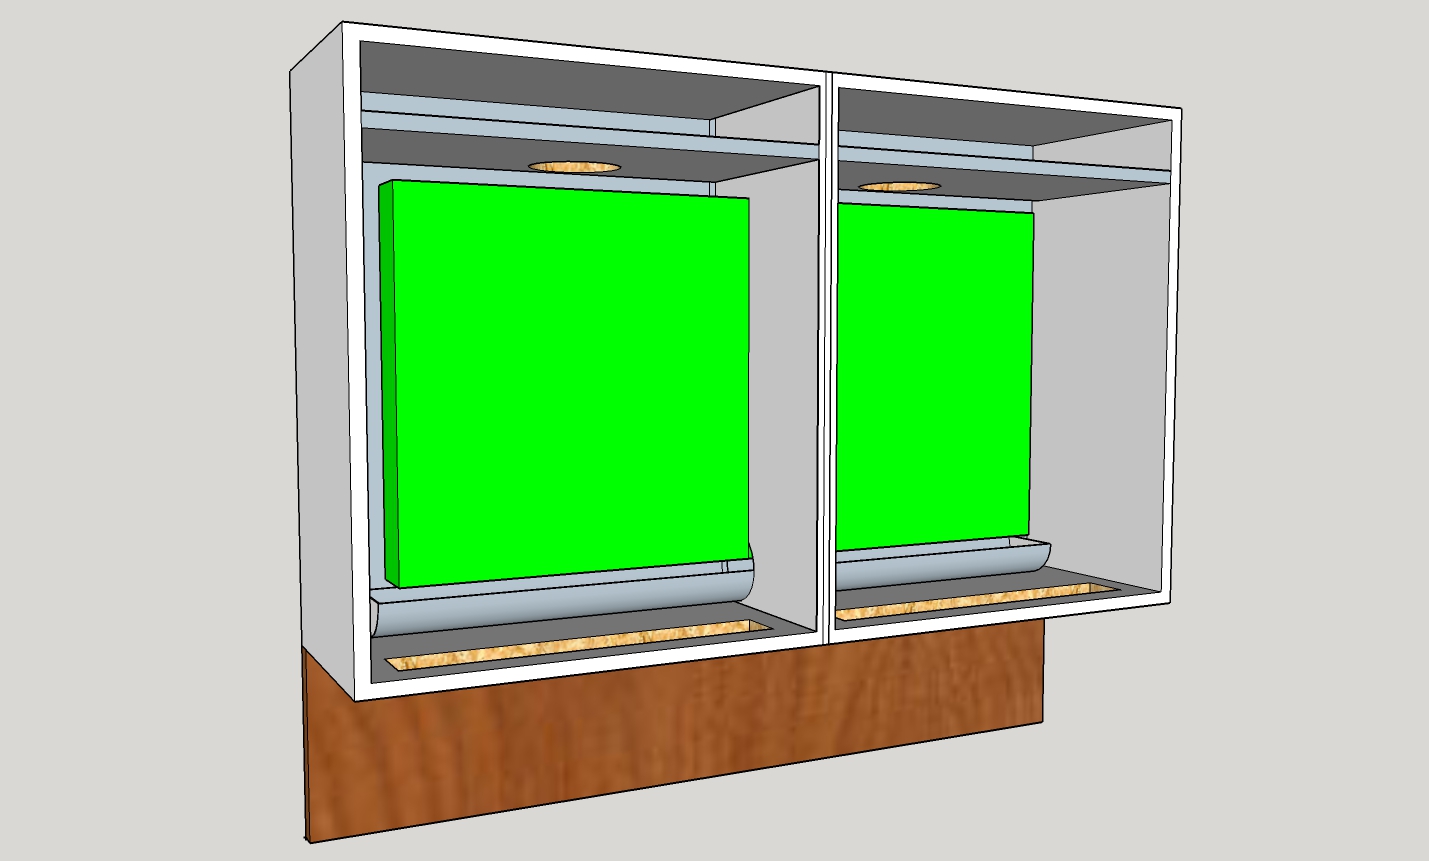
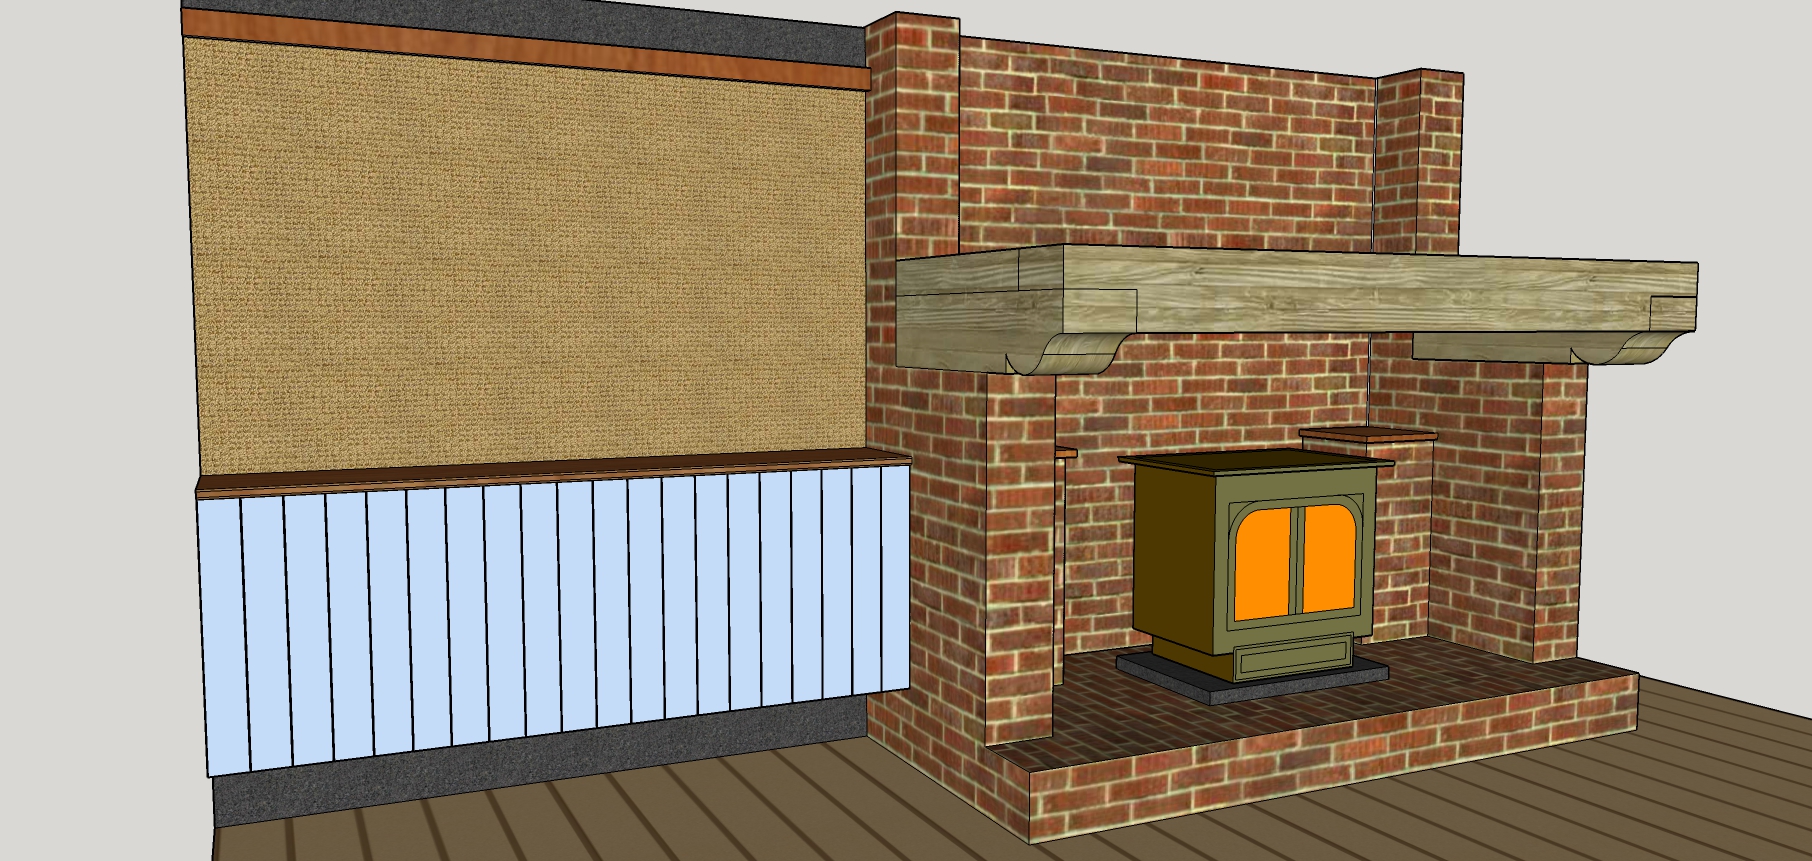
So here’s the Original Twist fan coil heater which is cheaper, quieter and more reliable. Double click this picture for a better look. Can’t see the heater? Neat huh.
cupboards with fan-coil heater built in.
Lets assume that the low cupboard in this sketch is made of typical 720mm x 300mm kitchen carcass units, (just like your top cupboards). A pair of them (each 600mm wide) with a large slot cut out of the inner sides allows a 1000mm x 500mm x 70mm double radiator to fit inside (£48 Screwfix). Each of the top shelves is fitted just low enough to mount a 140mm fan from a computer (£10 – 20 Amazon etc) and these gently blow air past the radiator and out of the bottom. You can decide where the air inlet goes: probably top front but a wall panel channelling much warmer air from ceiling height is worth a thought. Note that this is much smaller and neater than the huge radiators you would be trading up to if you were trying to make a heat pump conversion work.
When paired with a suitable heat pump this unit can also do air conditioning, hence the length of plastic guttering under the radiator to catch any condensation. However, a separate mini-split aircon unit (a very cheap heat pump) which delivers hot or cold air could be a much simpler installation. Cold air flows across the floor so spreads around the house surprisingly well. You don’t need multiple sources like you do for heating.
UV-C disinfection: For many asthma sufferers this will be the main feature. Fitting UV-C tubes in the top sections will neutralise airborne bacteria and viruses, colds and Covid included. There are pros and cons about the ozone produced so I’d recommend thorough research before going ahead. UV light can damage your eyes so put kill switches on the doors and make sure there is no direct light escaping from the air inlet. Also, mount the fans underneath the shelves to keep the light off them. For the same reason it makes sense to put the transformer, relays, wiring etc screwed to the underside of one of the shelves.
A pollen filter, such as fitted to many cars, dropped over the low outlet will help too and can be Hoovered clean easily enough.
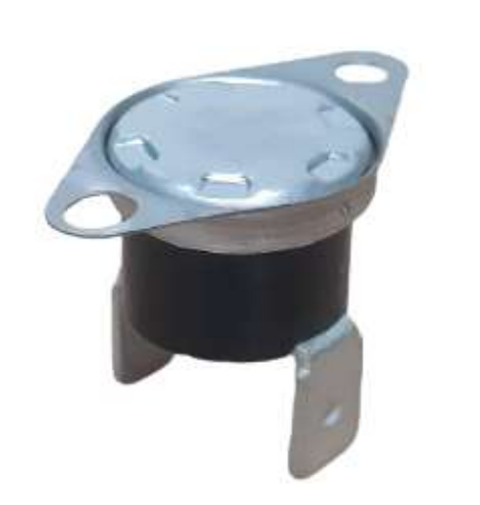
Controls: The fans can be switched on automatically when hot water arrives at the radiator. A bi-metallic thermostat switch will do the job simply enough – RS Components do one for about £8. It clicks on at 40C and off again at 25C. The switch can be glued directly onto the radiator near the water inlet. See picture below.
You’ll also need a variable resistor for speed control of the fans. They are 12v so you’ll need a power supply, another cheap PC component.
If you are doing the ‘off-peak energy storage for cheaper heating’ thing the hotter water is available for a boost start which could almost instantly make your bedroom warm for getting up. Fan-coils are best for bedrooms where you need fast response times; under floor heating takes ages to come on and then stays on too long.
Cleaning: Open the doors and Hoover it out – easy.
And that’s it really. A few simple components all easily obtained and making the perfect, reliable fan-coil unit. When turned down to essentially silent the fan pair will move about 100cfm and the heat output will be between 1 and 2kW depending on the water supply temperature. Turn up the fans to double this.
Noise? Just like putting your PC in a kichen cupboard so practically inaudible.
You might wonder why all this effort gives you anything better than the same radiator fitted as normal. The answer is that heat pumps don’t work efficiently at the 60c+ normally used with radiators. While under-floor heating is the best at very low temperatures a fan-coil unit works reasonably well at 40c. The only reason our unit has a radiator is that with all the fins in a double radiator you get a high surface area for not much money. The heat delivery couldn’t be more different. A radiator wafts hot air straight up to the ceiling where it tends to remain, replacement air then moves across the floor as a cold draught. A fan-coil, on the other hand, wafts warm air across the floor where it mixes with cooler air to give a faster and more comfortable heating experience.
Some extra mods
If you want to direct warm air somewhere in particular, patio doors for example, then a row of slats on the exit slot can send the air to the side. To go further with directed air flow you can also fit a duct or two to the bottom of the unit. This might be useful if you were trying to warm the air near those patio doors. In a new build you could fit a drain channel beside the doors (those ones with the clip-on metal tops) and blow hot air into the ends of the channel. That same channel could also be used as a handy route for the heating pipework and as an added benefit it makes the channel like a radiator in its own right.
MVHR reheat The MVHR system is essential in a modern house but as it is not 100% efficient it does cool the house slightly so using one of these fan-coil units as a re-heater is a neat and inexpensive route to perfection. If you have an MVHR system in mind you could run your return duct into the top of this unit with the benefit of hiding the outlet and getting a free blow from the MVHR fan.
What about the bathroom?
Now we’re talking. The perfect place to have hot air blowing especially when you are drying yourself. For a start turn the unit on its side so the air is blown from a vertical slot, then go one step further and have a pair of them so you step between them into a hot air blaster, like a giant Dyson hand dryer. Electricity in the bathroom! No worries there, keep it all 12v.
insulation matters
Have a look at this chart on heating costs for various house types to appreciate why a Passivhaus with a small heat pump and some fan-coil units could be the way to go. You’ll see that the ASHP can meet the Passivhaus demand for almost no cost. Indeed if the ASHP is connected to PV panels then the running cost of the house will be close to zero. This chart is out of date now but the message is the same.
I guess you might be in a state of shock now. Thousands saved on your heating strategy, the government might buy you a heat pump and air-conditioning can be a simple addition.
For more money saving shocks check out more building ideas on LIST OF POSTS.
High temperature heat pumps are a game changer. How about a sub £500 heating bill for the whole winter? Higher temperatures present a new opportunity to store cheap energy in a heat store (a large buffer tank).
Off-peak electricity costs a third of the day rate and that allows heat pump energy multiplication to produce unbelievably low-cost heating (like 2.5p/kW.hr). A heat store tank can time shift the night rates to the following day with that energy simply dispensed to underfloor heating and fan-coils by blending it back down to the required temperatures. With energy this cheap the inefficiencies of large buffer tanks and blending are hardly relevant.
Large tanks are better for high temperature heat pumps which don’t like short cycling and prefer a large volume of water to chew on so that’s another win.
For example: Over 5 hours a 12kW heat pump can place 60kW.hrs in 1,476 litres of water raised from 30c to 65c. As the model lower down shows, that costs just £300 over 200 days of winter. Similarly, a 1,000 litre tank, plus a large hot water cylinder and a heated floor slab make a good combination to store this night time bounty ready for the next day.
Cheaper than a battery
A 1,000 litre tank can store 40kW hours and costs about £1,500. A battery that can make 40kW.hrs (via a heat pump) would cost twice as much and could wear out after 10 years. Water lasts forever so works well as a storage medium; it doesn’t even ignite and burn your house down. Having said that, batteries are still very useful and will become strategically important when you access the very large one in your car. The battery is the top performer in the chart below because the heat pump will run a better COP during the day.
N.B The 7.5p off-peak rate is for electric cars but economy 7 is a workable alternative.
A much bigger heat pump
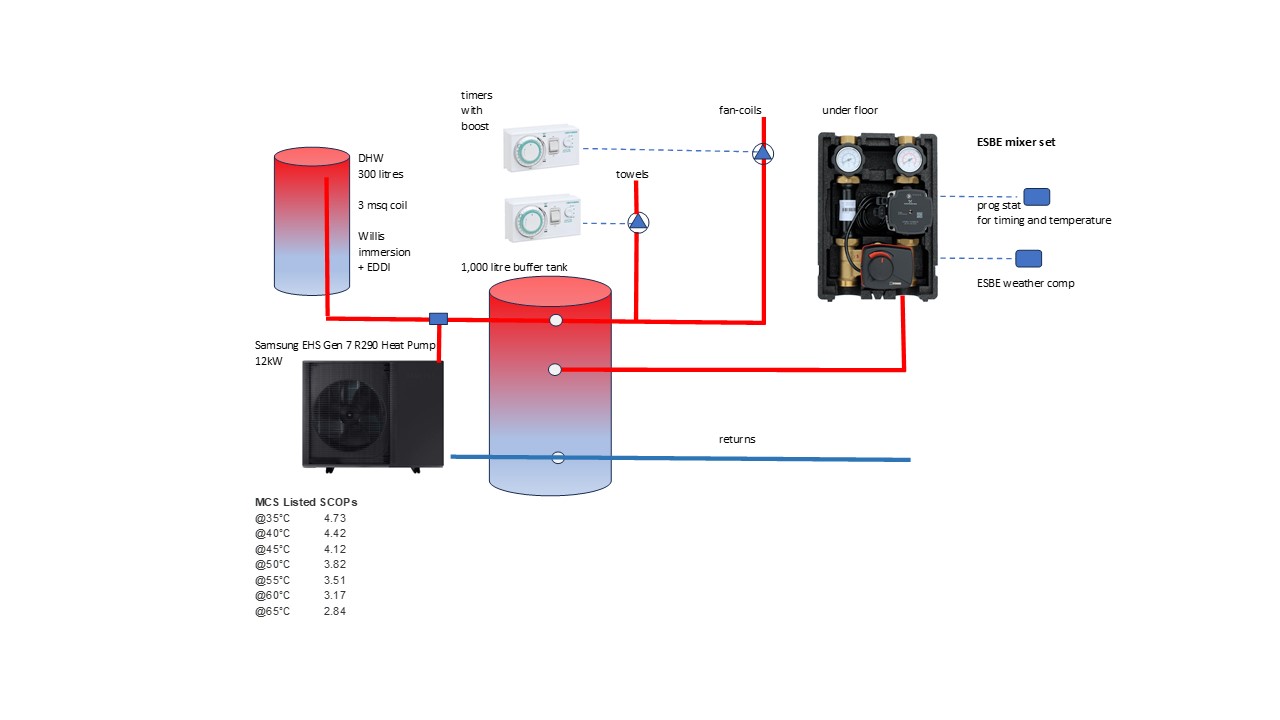
In order to bank the entire heating load over just a few night hours the heat pump will have to be significantly bigger than normal. 12kW (delivered) is a good place to start especially if only single-phase electricity is available. The Samsung EHS Gen7 R290 12kW is a good example.
Additional power
The calculated heat loss of the house must be matched by the heat pump power (to get the grant) and, on paper, a big heat pump will easily meet that requirement but the stored energy may not always meet the actual demands of the day. Cheap power is time limited rather than power limited.
If there is the occasional shortfall the heat pump is still there to give a powerful boost on that exceptionally cold day – however there is a better way.
Part of a sensible strategy is to have another smaller heat pump (like a mini-split air to air) that runs mainly free off solar panels. Obviously this helps to keep the electricity costs down but also gives the option of topping up when necessary at minimal cost. The blown air of a mini-split is immensly useful for laundry drying and the cooling feature gets the air-con requirement largely sorted too. Forget the daft headline costs of regular heat pumps – mini-splits can be bought for around £600 and you’d get one fully installed for under £2,000. With a typical consumption of around 1kW the mini-split will nearly always run free off the panels whereas the big heat pump would cost precious pennies to fire up.
Domestic hot water
To store off peak energy the 300 litre domestic hot water cylinder has standard 3msq coils for heat pump use. It may require a trickle charge during the day and instead of repeatedly firing up the heat pump an EDDI solar diverter tops it up via a Willis remote immersion heater (better for stratification and servicing if you were wondering). The EDDI captures even tiny excesses throughout the day to produce a higher temperature and the lost exports are about equal to the cost of running the heat pump.
System benefits
Water is usually hot enough to make towel rails work properly.
A large domestic hot water cylinder needs fewer daytime top ups if any.
The big heat pump gives faster DHW recovery times (if needed).
Fan-coils take from the hotter level of the heat bank.
Fan-coils can tolerate high temperatures so a boost mode is possible. Eg. 5 mins of full power on startup to give fantastic response times.
Heating can be zoned without complications.
Off-peak electricity is mainly renewable so this system is as green as Kermit.
Daily characteristics
In the morning the tanks will be hot and ready. The bathrooms will be toasty with the towel rails on full pelt and the floors heated. The bedroom fan-coils instantly transform a cold room into a warm one and there’s loads of hot water for showers. Downstairs the floors are already warm.
The towel rails stay on for a while but all else takes a rest until the floor slab downstairs calls for a top up from the big tank. With a bit of sunlight the EDDI starts to reheat the hot water tank and the mini-split might be able to run free.
At this point the big heat pump has not run at all, at any time, during the day. However, by the evening the temperature is getting low in the big tank, the floors can continue to keep warm even with water down to 25c but the fan-coils may need a last-minute boost from the big heat pump. UFH in bathrooms is a good counter to the possible end of day shortfall. Note that this is all fine tuning to avoid costs; if more heat is required then the system can perform just like any other and in fact even better because it’s so powerful.
Controls
Everything is much simplified with no interlinking of controls.
The heat pump is allowed windows of operation on a timer and tank thermostats.
The night time set point would be 67C and 45C for the day – settable on the heat pump.
The UFH is timed and controlled by a programmable thermostat – an ESBE mixer adds weather compensation.
Fan-coils (OriginalTwist DIY units of course) are timed and thermostatically controlled locally.
Simplicity
There are many options to add sophistication to this system; weather compensation, ESBE electronic temperature reducers, blending down for fan-coils, fan-coils boost feature, air source GSHP boosting (as per the OriginalTwist hybrid concept), batteries.
All should be weighed by the PV test: would the money be better spent on more PV panels?
ZERO COST HEATING
As you increase the size of a solar array so the energy bills fall and the export tally rises. For some well insulated houses the income will pay the electricity bills – ZERO COST heating has just become easier.
From the chart below you can work out how many kW.hrs your current system requires over the winter. Just compare each £1,000 bar with your own bills. 25 -30,000 kW.hrs would be normal. Ultra insulated homes are nearer to 15,000 and only about a third of the way up a £1,000 bar. Note how the off-peak system is easily twice as good as anything else. Want a laugh? Compare direct electric resistance heating with the off peak system.
Just how cheap for 200 days of winter?
The Original Twist model of this entire system looks something like this:
A 12kW ASHP running for 300 minutes a night charges a 1,000 litre tank, a 300 litre hot water cylinder and the floor slab.
Over 200 days of winter this makes 12,000kW.hrs for £300. No, that’s not a mistake, £300 for 200 days!
The 3kW mini-split adds 1,000 kW.hrs for £125 (half from PV).
Total cost for 13,000 kW.hrs is £425 and less with large PV.
The same energy would cost £570 more with conventional daytime heating.
You’ll see on the chart below how night time use of an ASHP (blue line) is particularly disadvantageous compared to a GSHP (black line) which doesn’t really see any significant changes in source temperatures. From that point of view it might seem that this system will be optimised by using a GSHP for the night runs and an ASHP for the day time back up.
The GSHP will not suffer the defrosting cycles which will eat up into the precious off-peak time and the COP will be excellent particularly if the Originaltwist air/ground hybrid idea is incorporated..
You won’t find an R290 high temperature GSHP: that’s because they are fitted indoors and spilled R290 is toxic. The 10kW IVT E11 GSHP might be a contender though. The maximum temperature is lower though so you’d need more water storage; probably a pair of tanks.
Conclusion
This idea can be scaled and tweaked to suit individual requirements but the underlying message is convincing.
Off-peak electricity can be time shifted with large amounts of water to dramatically cut heating costs.
A concrete slab floor also stores heat usefully so a boost at the last hours of off-peak could be part of the mix.
N.B. If you want the grant, with it’s strict rules, you have to ‘design’ the system for normal efficient heat pump systems and then run it ‘inefficiently’ at night when all the techies have paid up and gone.
Note that a heat pump costs about £5,000 so when you are quoted £15,000, guess who really gets the grant money!


Leave a comment